
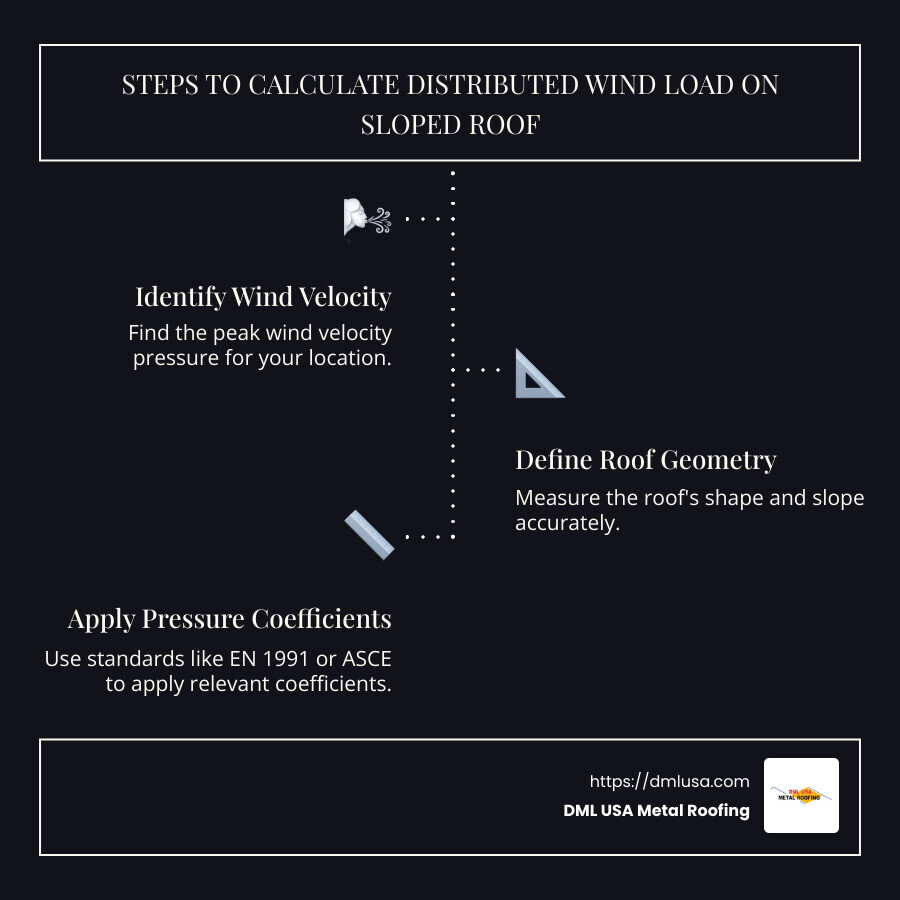
When it comes to building safety and durability, understanding calculate the distributed wind load of sloped roof is paramount. Here’s a quick breakdown for those seeking smart, safe, and resilient roofing solutions:
- Identify the peak wind velocity pressure specific to your location.
- Define the roof’s geometry, including its shape and slope.
- Apply relevant external pressure coefficients from standards like EN 1991 or ASCE.
- Calculate the final wind load borne by the roof through these metrics.
Wind loads are a crucial component in ensuring a roof’s structural integrity, especially for sloped designs that often face varying pressures from different directions. A roof that can adequately distribute these loads not only lasts longer but also improves home safety and value, reducing the need for frequent repairs.
I’m Adam Kadziola, deeply engaged with building and home improvement since 2007. I specialize in ensuring every roof withstands the toughest of nature’s tests. I’m here to guide you through the complexities of how to calculate the distributed wind load of sloped roof, drawing upon experience in the roofing industry. Up next: dive into the concept of wind loads and their impact on roof design.
Understanding Wind Loads
Wind loads are a pivotal aspect of structural design, particularly for sloped roofs. They are essentially the forces exerted by the wind on a structure. Let’s break down the core components involved in understanding wind loads.
Wind Pressure
Wind pressure is the force exerted by the wind per unit area on a surface. It varies based on wind speed, direction, and the surface it interacts with. For sloped roofs, this pressure can be more complex due to the angles involved, which can result in different pressure zones across the roof’s surface.
Velocity Pressure
Velocity pressure is an integral part of calculating wind loads. It refers to the pressure exerted by the wind’s speed as it hits a structure. The formula for velocity pressure is:
[ q = 0.5 \times \rho \times v^2 ]
Where:
– ( q ) is the velocity pressure
– ( \rho ) is the air density
– ( v ) is the wind speed
Understanding velocity pressure helps engineers predict how much force the wind will exert on a roof, which is crucial for designing structures that can withstand high winds.
Gust Effect Factor
The gust effect factor accounts for the fluctuations in wind speed and pressure due to turbulence. It’s a multiplier applied to velocity pressure to adjust for these variations. This factor ensures that the calculated wind load considers not just average wind conditions but also sudden gusts that could impact a building’s stability.
For sloped roofs, incorporating the gust effect factor is vital. It helps in designing roofs that can handle unexpected wind surges, thus maintaining the structural integrity of the building.
By understanding these elements—wind pressure, velocity pressure, and the gust effect factor—engineers and builders can design more resilient structures. This knowledge ensures that sloped roofs, like those offered by DML USA Metal Roofing, can withstand the forces of nature, providing safety and durability for years to come.
Calculate the Distributed Wind Load of Sloped Roof
Calculating the distributed wind load on a sloped roof involves understanding key standards like ASCE 7-10 and ASCE 7-16. These guidelines help engineers ensure that structures can withstand wind forces safely.
Wind Load Calculation
To calculate wind loads, engineers use a combination of formulas and factors. The primary formula for calculating wind pressure on enclosed and partially enclosed buildings is:
[ p = qG{C}{p} -{q}{i}({GC}_{pi}) ]
Where:
– ( p ) is the wind pressure
– ( q ) is the velocity pressure
– ( G ) is the gust effect factor
– ({C}{p}) is the external pressure coefficient
– (({GC}{pi})) is the internal pressure coefficient
For sloped roofs, it’s crucial to consider the roof’s shape and angle, as these affect how wind pressure is distributed. The roof’s slope can create varying pressure zones, which require precise calculations to ensure the roof’s stability.
ASCE 7-10 and ASCE 7-16
ASCE 7-10 and ASCE 7-16 are essential when determining wind loads. These standards provide detailed procedures for calculating wind pressures on structures, considering factors like risk category, terrain, and roof geometry.
-
ASCE 7-10 focuses on the directional procedure, which is ideal for complex structures like sloped roofs. It provides a comprehensive approach to calculating wind loads by considering the building’s orientation and the wind’s direction.
-
ASCE 7-16 builds upon its predecessor by introducing updates that account for new research and data on wind behavior. It offers refined methods for calculating wind pressures, ensuring even greater accuracy and safety for modern structures.
Practical Application
For a practical example, consider a plant structure in Cordova, Memphis, Tennessee, with a roof slope of 3:16. Using ASCE 7-10, engineers would calculate the basic wind speed (120 mph for this location) and apply the formulas to determine the distributed wind load. This ensures the roof can withstand local wind conditions without compromising its integrity.
By adhering to these standards and methodologies, engineers can design roofs that are not only safe but also durable against the elements. This is particularly important for companies like DML USA Metal Roofing, which prioritize high-quality, resilient roofing solutions for their clients.
In the next section, we’ll dig into the key factors that influence wind load calculations, such as risk category, exposure category, and topographic factor. Understanding these elements is crucial for accurate wind load assessments.
Key Factors in Wind Load Calculation
When calculating the distributed wind load on a sloped roof, several key factors come into play. Each factor helps determine how wind affects a structure, ensuring it can withstand environmental forces. Let’s explore these crucial elements: risk category, exposure category, and topographic factor.
Risk Category
The risk category of a structure is determined by its use or occupancy. This classification affects the level of safety required in its design. For instance, a plant structure might be classified as Risk Category IV, which includes buildings essential for emergency services or those that pose a significant risk to the public in case of failure. The higher the risk category, the more stringent the design requirements to ensure the structure can handle extreme conditions.
Exposure Category
The exposure category defines the surrounding terrain’s influence on wind speed at a site. It’s determined by examining the upwind landscape, particularly within a 45° sector. There are three main exposure categories:
- Exposure B: Urban or suburban areas with numerous structures.
- Exposure C: Open terrain with scattered obstructions, like farmland. For example, a plant structure in Cordova, Memphis, Tennessee, is classified as Exposure C due to its flat farmland surroundings.
- Exposure D: Flat, unobstructed areas near large bodies of water.
Selecting the correct exposure category is vital as it directly impacts the calculation of wind loads, with Exposure C resulting in higher loads than Exposure B.
Topographic Factor
The topographic factor, ({K}_{zt}), accounts for the effects of hills, ridges, and escarpments on wind speed. Structures on flat terrains, like farmland, often have a topographic factor of 1.0. However, if the site has significant elevation changes, additional calculations are necessary to adjust the wind load accordingly. The topographic factor is crucial because it can significantly alter the wind pressure experienced by a structure.
By understanding these key factors, engineers can accurately calculate wind loads and design roofs that are safe and robust. Companies like DML USA Metal Roofing rely on these calculations to provide durable roofing solutions that withstand even the harshest weather conditions.
In the next section, we’ll explore the tools and methods used for calculating wind loads, including manual calculations and software integration. These tools are essential for ensuring precise and efficient wind load assessments.
Tools and Methods for Calculation
When it comes to calculating the distributed wind load of a sloped roof, having the right tools and methods at your disposal is essential. This ensures that your calculations are accurate, efficient, and reliable. Let’s explore some of the most effective approaches, including the SkyCiv Wind Load Calculator, manual calculations, and software integration.
SkyCiv Wind Load Calculator
The SkyCiv Wind Load Calculator is a powerful tool for determining wind loads on various structures, including sloped roofs. It simplifies the process by automating complex calculations based on standards like ASCE 7-10. This tool can save engineers significant time and effort, providing detailed results with just a few inputs. You simply need to enter your building’s location, dimensions, and other relevant data, and the calculator handles the rest.
Using the SkyCiv tool can be particularly beneficial for engineers working with DML USA Metal Roofing systems, as it ensures that all calculations align with the latest industry standards. Plus, it’s designed to be user-friendly, making it accessible even for those who might not be experts in wind load calculations.
Manual Calculations
For those who prefer a hands-on approach, manual calculations are still a viable option. This method involves using established formulas, such as those outlined in the ASCE 7-10 standard.
To manually calculate wind loads, you’ll need to determine several factors, including velocity pressure, gust effect factor, and pressure coefficients. While this method can be time-consuming, it offers a deep understanding of how each variable affects the final load calculation.
Manual calculations are a great way to verify results from software tools or gain a deeper insight into the mechanics of wind load distribution. They can also be helpful for educational purposes or when specific software tools are unavailable.
Software Integration
Integrating wind load calculations into broader design software can streamline the engineering process. Many structural analysis programs now offer wind load modules that automatically incorporate these calculations into the overall design workflow.
Software integration allows for the seamless inclusion of wind load data in structural models, ensuring that all aspects of the design are cohesive and accurate. This integration is crucial for complex projects where multiple environmental factors must be considered simultaneously.
For instance, using integrated software, engineers can easily assess how different roof pitches or building orientations affect wind load distribution. This capability is invaluable for companies like DML USA Metal Roofing, which aims to provide durable, reliable roofing solutions.
By leveraging tools like the SkyCiv Wind Load Calculator, manual calculations, and integrated software, engineers can ensure that their designs are both safe and efficient. These methods provide the flexibility to choose the most suitable approach for any given project, ensuring accurate wind load assessments every time.
Next, we’ll address some frequently asked questions about wind load calculations, diving deeper into how wind velocity pressure is determined and the role of the gust effect factor.
Frequently Asked Questions about Wind Load Calculations
How to calculate wind velocity pressure?
Calculating wind velocity pressure is a crucial step in assessing wind loads on structures. Velocity pressure, often denoted as ( q ), is determined using the formula:
[ q = 0.5 \times \text{Air density} \times \text{Wind speed}^2 ]
This formula accounts for the density of air and the speed of the wind, both of which significantly impact the pressure exerted on a structure. For most calculations, the standard air density at sea level is used, which is approximately 1.225 kg/m³. However, if you’re in a location with different atmospheric conditions, like high altitudes or extreme temperatures, it’s important to adjust this value accordingly.

What is the role of the gust effect factor?
The gust effect factor is a key component in wind load calculations, designed to account for the fluctuations in wind speed over short periods. Wind isn’t a constant force; it gusts and varies, which can cause additional stress on structures. This factor adjusts the wind pressure to reflect these variations, ensuring that buildings can withstand sudden increases in wind speed.
In structural design, incorporating the gust effect factor ensures that the design is robust enough to handle not just the average wind conditions but also the extreme gusts. This is especially important for tall or slender structures, which are more susceptible to dynamic wind effects. By considering the gust effect factor, engineers can improve the safety and durability of their designs.
How do terrain and location affect wind load?
Terrain and location are pivotal in determining the wind load on a structure. The exposure category, for example, is a classification that reflects the surrounding environment’s impact on wind speed and pressure. Open terrains like farmlands (Exposure C) allow wind to gain speed and exert more force on structures, whereas urban areas with numerous buildings (Exposure B) tend to reduce wind speed due to obstruction.
Moreover, the topographic factor, denoted as ( K_{zt} ), considers the influence of hills, ridges, or escarpments, which can amplify wind speeds. For instance, a building on a hilltop will experience higher wind pressures compared to one in a valley.
Understanding how terrain and location affect wind load is essential for accurate calculations. Engineers can use satellite images or maps to assess the exposure category and ensure that the structural design aligns with the specific environmental conditions of the site. This knowledge helps in designing buildings that are not only compliant with safety standards but also optimized for their specific location.
Conclusion
At DML USA Metal Roofing, we understand that when it comes to roofing, durability and long-term performance are top priorities. That’s why our metal roofing products are designed to withstand the elements, including the challenging wind loads that can affect sloped roofs. Our products are not only built to last but also come with additional benefits like energy tax credits, making them a smart choice for homeowners.
Durable Roofing: Our metal roofs are engineered to resist high winds, heavy snow, and even hail, offering peace of mind in any weather. With a 120-mph wind rating, you can trust that your roof will stand firm, protecting your home and family. Plus, our roofs are made with high-quality materials that require minimal maintenance, saving you time and effort over the years.
Energy Tax Credits: Installing a DML USA metal roof can also be a financially savvy decision. Our roofs are highly reflective and can significantly reduce your home’s cooling costs in the hot summer months. This energy efficiency can qualify you for energy tax credits, adding another layer of savings to your investment.
Choosing DML USA Metal Roofing means selecting a partner committed to providing high-quality, affordable roofing solutions that meet the highest standards of safety and sustainability. Whether you’re looking to replace an old roof or build a new home, our metal roofing systems are designed to offer best performance and value.
Explore our range of products here and find how our roofing solutions can improve your home’s durability and efficiency.
