
how are metal roofs installed: 11 Powerful Steps for Success 2025
Why Metal Roofing Has Become the Smart Homeowner’s Choice
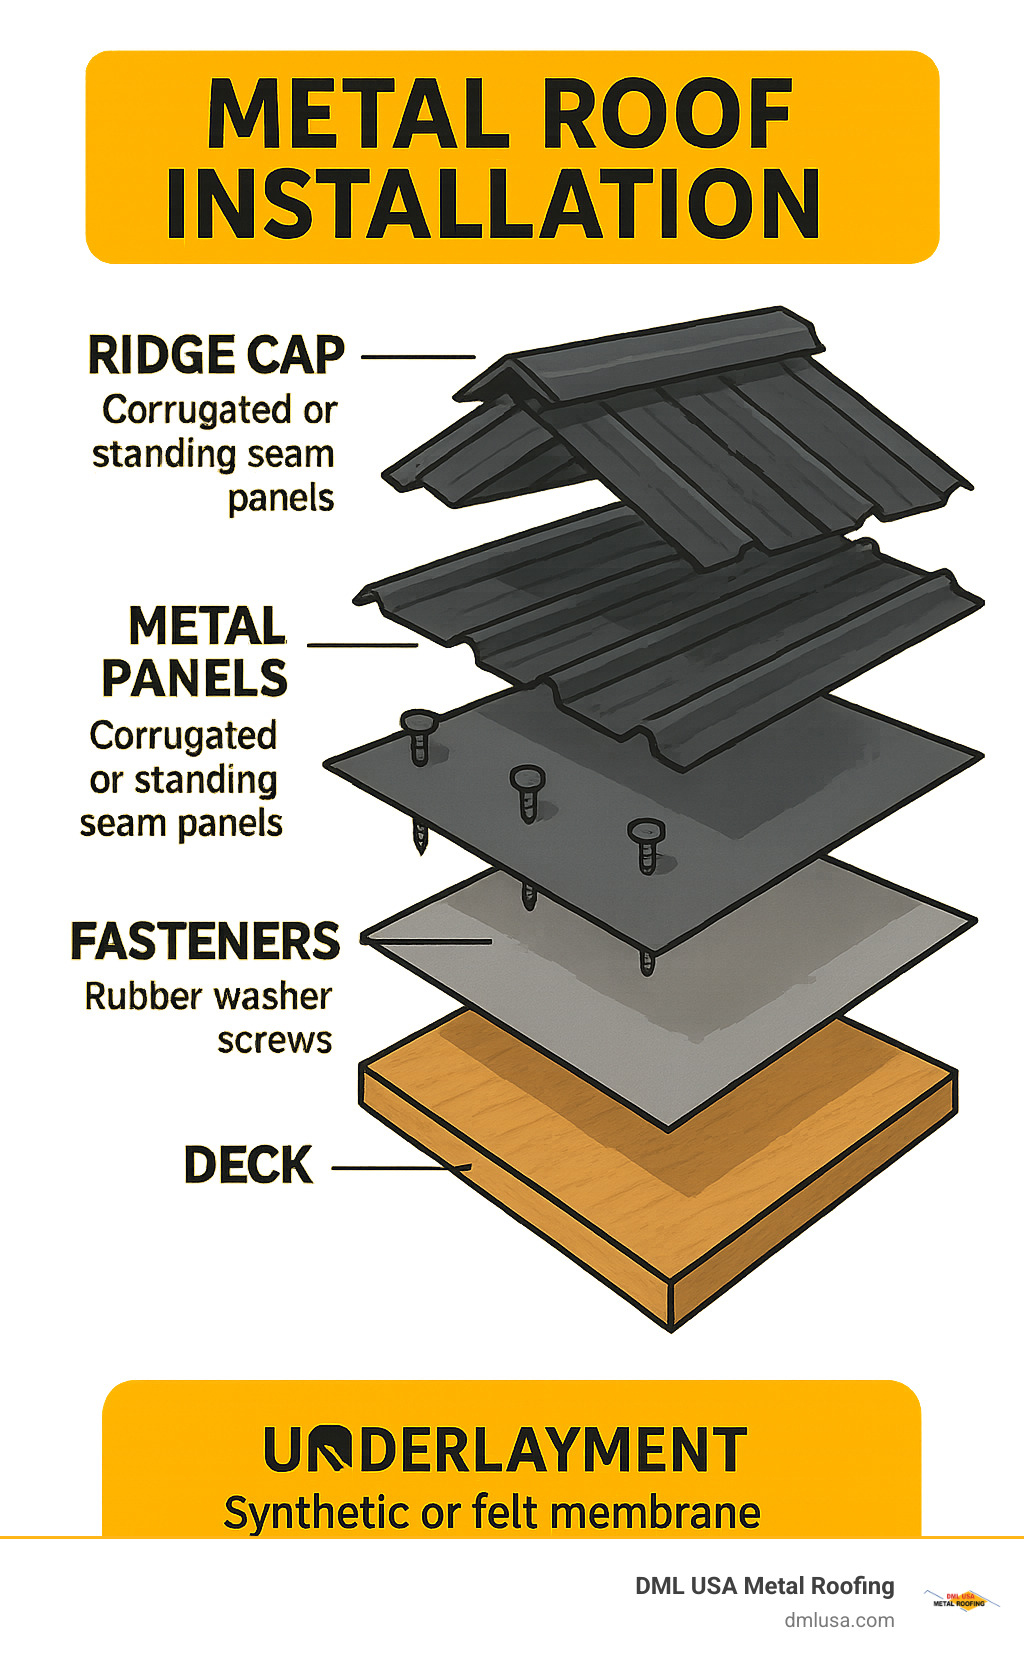
How are metal roofs installed through a systematic process that combines durability with precision. If you’re looking for a quick answer, here’s how metal roofs are typically installed:
- Preparation: Measure roof, remove old roofing (optional), repair deck
- Underlayment: Install synthetic underlayment or ice/water shield
- Trim: Attach drip edge and eave flashing
- Panels: Install metal panels from bottom to top with proper overlaps
- Fastening: Secure with rubber-washer screws at manufacturer-specified intervals
- Finishing: Add ridge caps, flashing around penetrations, and sealant
Metal roofing has emerged as the top choice for homeowners seeking long-term value. Unlike traditional asphalt shingles that require replacement every 15-20 years, a properly installed metal roof can last 40-70 years with minimal maintenance. This exceptional durability comes with additional benefits: energy efficiency through heat reflection, environmental sustainability through recyclability, and improved curb appeal with a variety of styles and colors.
When considering a metal roof installation, understanding the process is crucial for making informed decisions – whether you’re hiring professionals or contemplating a DIY approach. While the upfront cost may be two to three times higher than asphalt shingles, the long-term savings in replacement costs, energy bills, and potential insurance discounts make metal roofing a sound investment for your home.
My name is Adam Kadziola from DML USA Metal Roofing, where I’ve been manufacturing high-quality metal roofing products since 2007 and have gained extensive knowledge about how are metal roofs installed through years of working with both professional contractors and DIY homeowners across Illinois.
Why Metal Beats Asphalt
Metal roofing offers remarkable advantages over traditional asphalt shingles. The most compelling benefit is longevity—while you’ll replace an asphalt roof 2-3 times over the life of your home, a quality metal roof from DML USA can be the last roof you’ll ever need to install.
Our metal roofs are engineered to withstand decades of harsh Illinois weather, from Chicago’s windy conditions to the extreme temperature fluctuations throughout the state. They won’t crack, split, or deteriorate like asphalt shingles, and they’re virtually maintenance-free.
Beyond durability, metal roofing offers substantial environmental benefits. Unlike asphalt shingles that contribute millions of tons to landfills annually, metal roofing is 100% recyclable at the end of its useful life. Many of our panels already contain recycled content, making them an environmentally responsible choice.
Homeowners also benefit from potential energy tax credits. Metal roofs naturally reflect solar radiation rather than absorbing it, reducing cooling costs by up to 25% during hot summer months. As one Northlake homeowner reported: “After installing our DML USA metal roof, we saw our summer cooling bills drop by nearly $50 per month.”
How Are Metal Roofs Installed? Overview of Systems
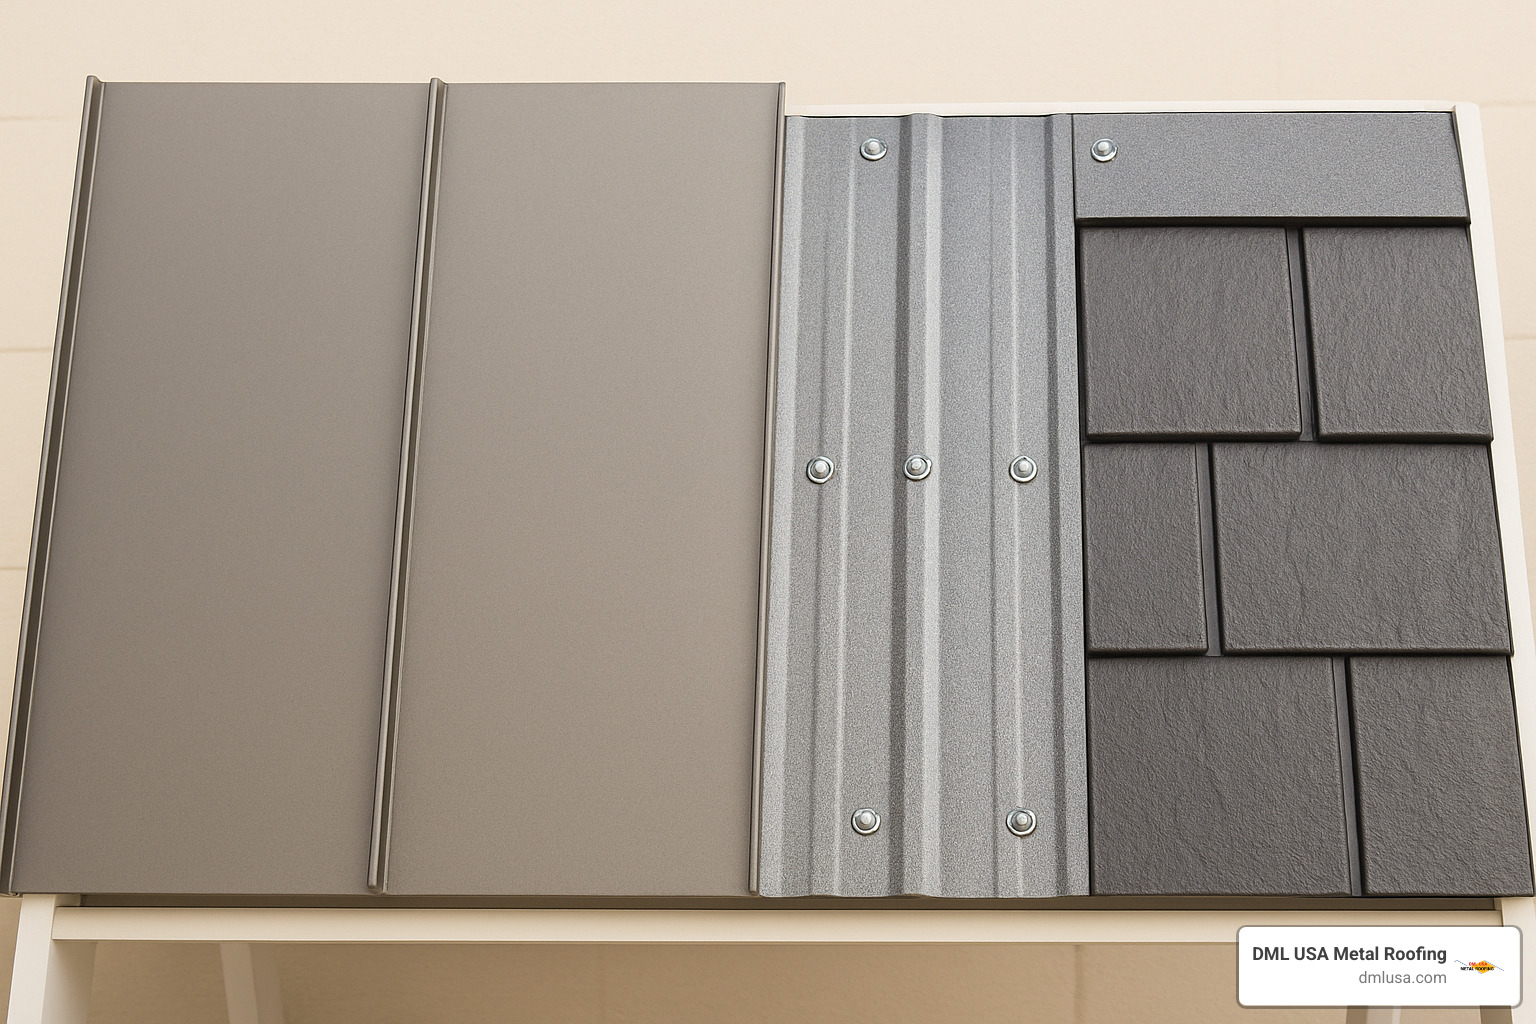
When you’re considering metal roofing, you’ll encounter several popular styles that each have their own personality and installation approach. Standing seam panels (see this helpful Wikipedia overview) are the sleek, modern option with raised interlocking seams that hide fasteners for a clean look. Corrugated panels are the classic, wavy-looking economical choice with exposed fasteners that many folks associate with barns (though today’s versions look fantastic on homes). Metal shingles are the chameleons of the bunch, designed to mimic traditional materials like slate or wood while providing metal’s durability. And metal tiles offer the Mediterranean clay tile appearance without the weight or fragility.
The installation method is just as important as the panel style. There are two main approaches to getting those panels on your roof:
- Batten System Installation: Think of this as creating a raised platform for your metal roof
- Direct-to-Deck Installation: This is the more straightforward approach of attaching panels directly to your roof deck
Most metal roofing systems need at least a 3:12 pitch (that means your roof rises 3 inches for every horizontal foot). If your Illinois home has a flatter roof, don’t worrywe’ll need to use special techniques and panel types to ensure water doesn’t decide to make itself at home.
One thing I love sharing with homeowners is the science behind metal roofs. Research from the Metal Construction Association shows they significantly reduce solar heat gain into your attic spaces. When we create a proper installation with ventilation between the deck and panels, your home stays cooler naturallymeaning your air conditioner can take more breaks during those humid Illinois summers!
How are metal roofs installed on battens?
Imagine creating a framework that lifts your new metal roof slightly above your existing roof surfacethat’s essentially what a batten system does. Here’s the friendly version of how it works:
We start by laying down a grid of wooden or metal “battens” (typically 13 or 22 strips) across your roof. These battens create a 19″ airspace between your old roof and the new metal panels. Then, instead of fastening the metal directly to your roof deck, we attach it to these battens.
This approach offers some wonderful benefits for Illinois homeowners. The improved ventilation from that continuous airspace helps your roof breathe, reducing heat buildup in your attic. It’s also great for creating a leveling surface if your existing roof has some waves or irregularitiescommon in older Chicago-area homes. Many of our customers love the roof-over option that lets them avoid the mess and expense of tearing off old shingles. And the energy efficiency boost comes from that air gap acting like a thermal break.
I remember a customer in a 100-year-old Oak Park bungalow who told me, “The batten system was perfect for usour old roof had more waves than Lake Michigan! Now our metal roof looks perfectly straight despite what’s underneath.” That’s the magic of battens for you!
How are metal roofs installed direct-to-deck?
Direct-to-deck installation is exactly what it sounds likea more straightforward approach where we attach metal panels directly to your roof deck without the middleman of battens. This method shines on homes with clean, straight roof lines or homes with architectural complexity.
We start by installing a high-quality synthetic underlayment directly on your roof deck (typically plywood or OSB). This critical layer provides an additional water barrier beneath your metal. Then we carefully measure, cut, and place the metal panels directly onto this prepared surface.
The precision fitting possible with direct-to-deck makes it ideal for homes with skylights, dormers, and other features that require careful cutting and fitting. Many homeowners prefer the cleaner appearance of this lower-profile look. It’s also a simplified process with fewer materials and steps, which often makes it more cost-effective than batten systems.
A customer from Naperville with a contemporary home told us, “We chose direct-to-deck installation with DML USA panels because we wanted that sleek, modern look. The installers worked magic cutting the panels precisely around our multiple skylightsit looks like the roof was custom-made in a factory!”
Whether you choose battens or direct-to-deck, the good news is that both methods can be expertly handled by our Illinois installation teams. We’ll help you decide which approach makes the most sense for your specific home, budget, and aesthetic goals.
Pre-Installation Prep: Measurements, Materials & Safety
Before you climb that ladder, let’s talk about proper preparation for your metal roof installation. Getting your ducks in a row now will save you headaches, time, and money later. Trust me, I’ve seen what happens when folks skip this crucial step!
Taking accurate measurements is your first task. Remember to account for your roof’s slope when calculating materials. The slope factor formula (√(rise² + run²) ÷ run) helps determine the actual surface area. For example, a simple 10×10 ft section with a steep 12/12 pitch has a slope factor of 1.414, giving you 141 sq ft of actual roof area—not the 100 sq ft you might assume looking at your house from above.
Always order at least 10% extra material. This buffer accounts for waste, mistakes, and those tricky cuts around vents and chimneys. It’s much better to have a few extra panels than to halt your project midway while waiting for additional materials to arrive.
Essential Tools & Materials
Your metal roofing toolkit needs to be ready before the first panel goes up. Quality tools make all the difference between a frustrating weekend and a smooth installation.
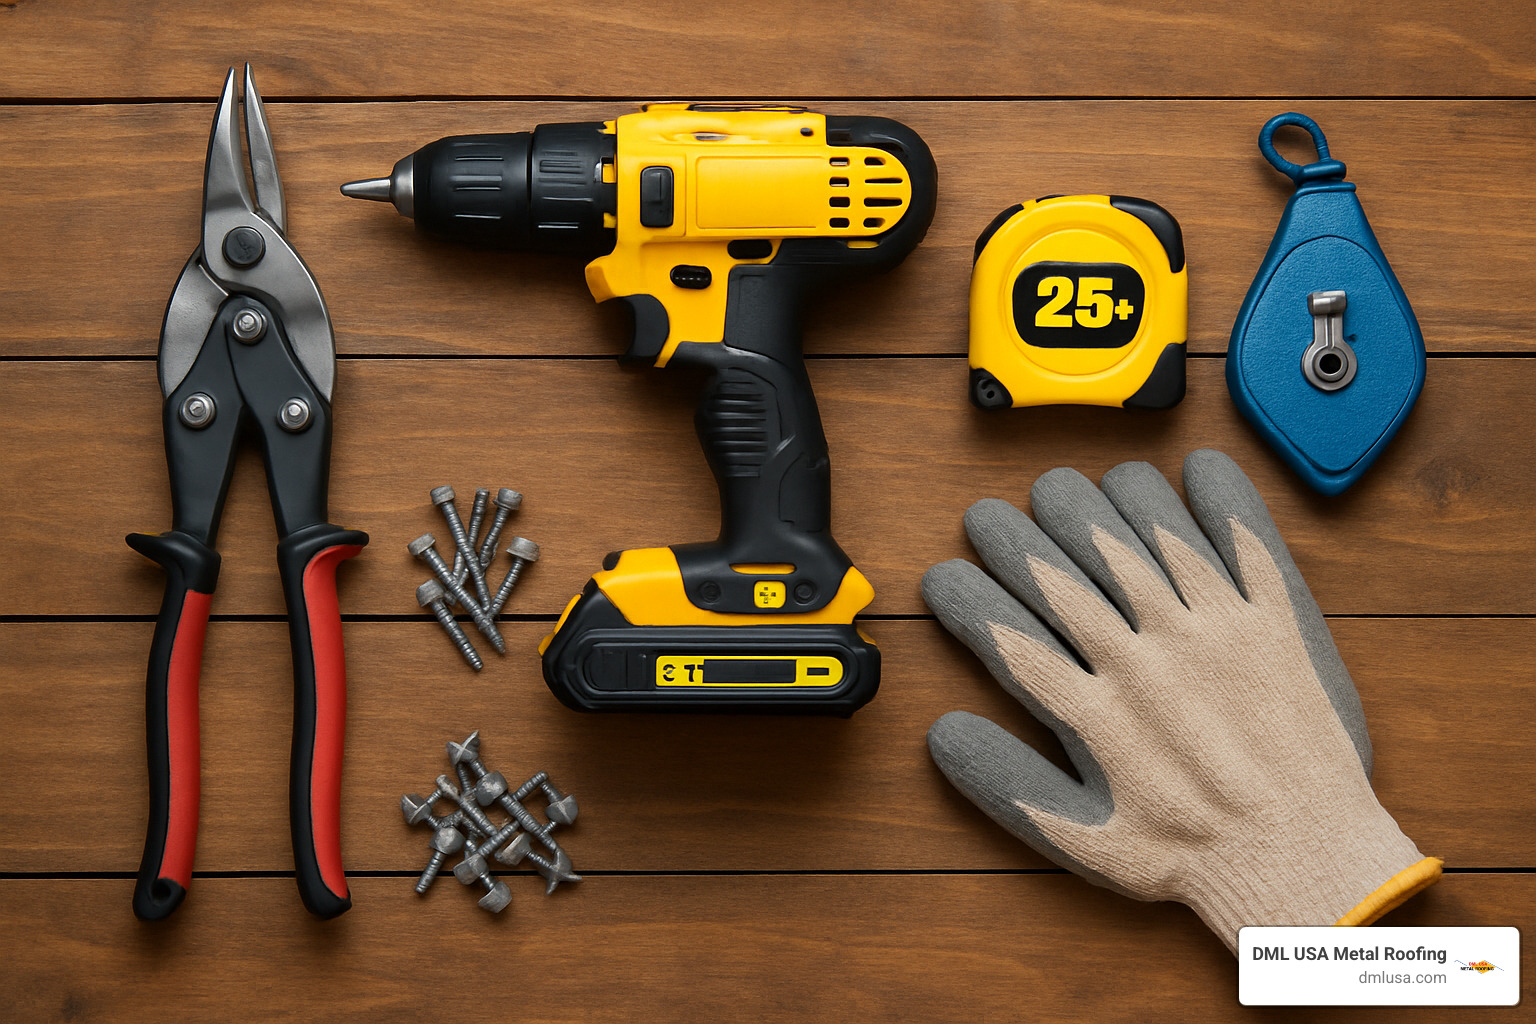
You’ll need a reliable tape measure and chalk line for layout, tin snips and metal shears for cutting panels, and an electric drill with magnetic bit holder to prevent dropping screws while on the roof. A good hand seamer helps with precise metal bends, while aviation snips (straight, left, and right cutting) allow you to make clean cuts in different directions.
Don’t forget your circular saw with metal-cutting blade for longer cuts and a caulking gun for applying sealants. As for materials, beyond your metal panels, you’ll need synthetic underlayment, self-tapping screws with neoprene washers, butyl tape for sealing seams, and foam closure strips shaped to match your panel profiles.
“I learned the hard way about having the right tools,” shares one Illinois homeowner who installed his own DML USA metal roof. “I started with regular scissors instead of proper tin snips. After blistered hands and jagged cuts, I invested in quality tools that made the rest of the job so much easier.”
When selecting your metal roofing material, consider these options carefully:
| Metal Type | Pros | Cons | Typical Lifespan |
|---|---|---|---|
| Steel (Galvanized) | Economical, strong, variety of colors | Can rust if coating is damaged | 40-60 years |
| Steel (Galvalume) | Better corrosion resistance than galvanized | Slightly more expensive | 40-70 years |
| Aluminum | Excellent corrosion resistance, lightweight | More expensive, can dent easier | 50+ years |
| Copper | Extremely long-lasting, develops patina | Very expensive, limited color options | 100+ years |
| Zinc | Self-healing, develops patina, eco-friendly | Expensive, specialist installation | 80+ years |
At DML USA Metal Roofing, we offer premium steel and aluminum options perfectly suited to withstand Illinois’ challenging weather conditions, from Chicago’s windy lakefront to southern Illinois’ hot summers.
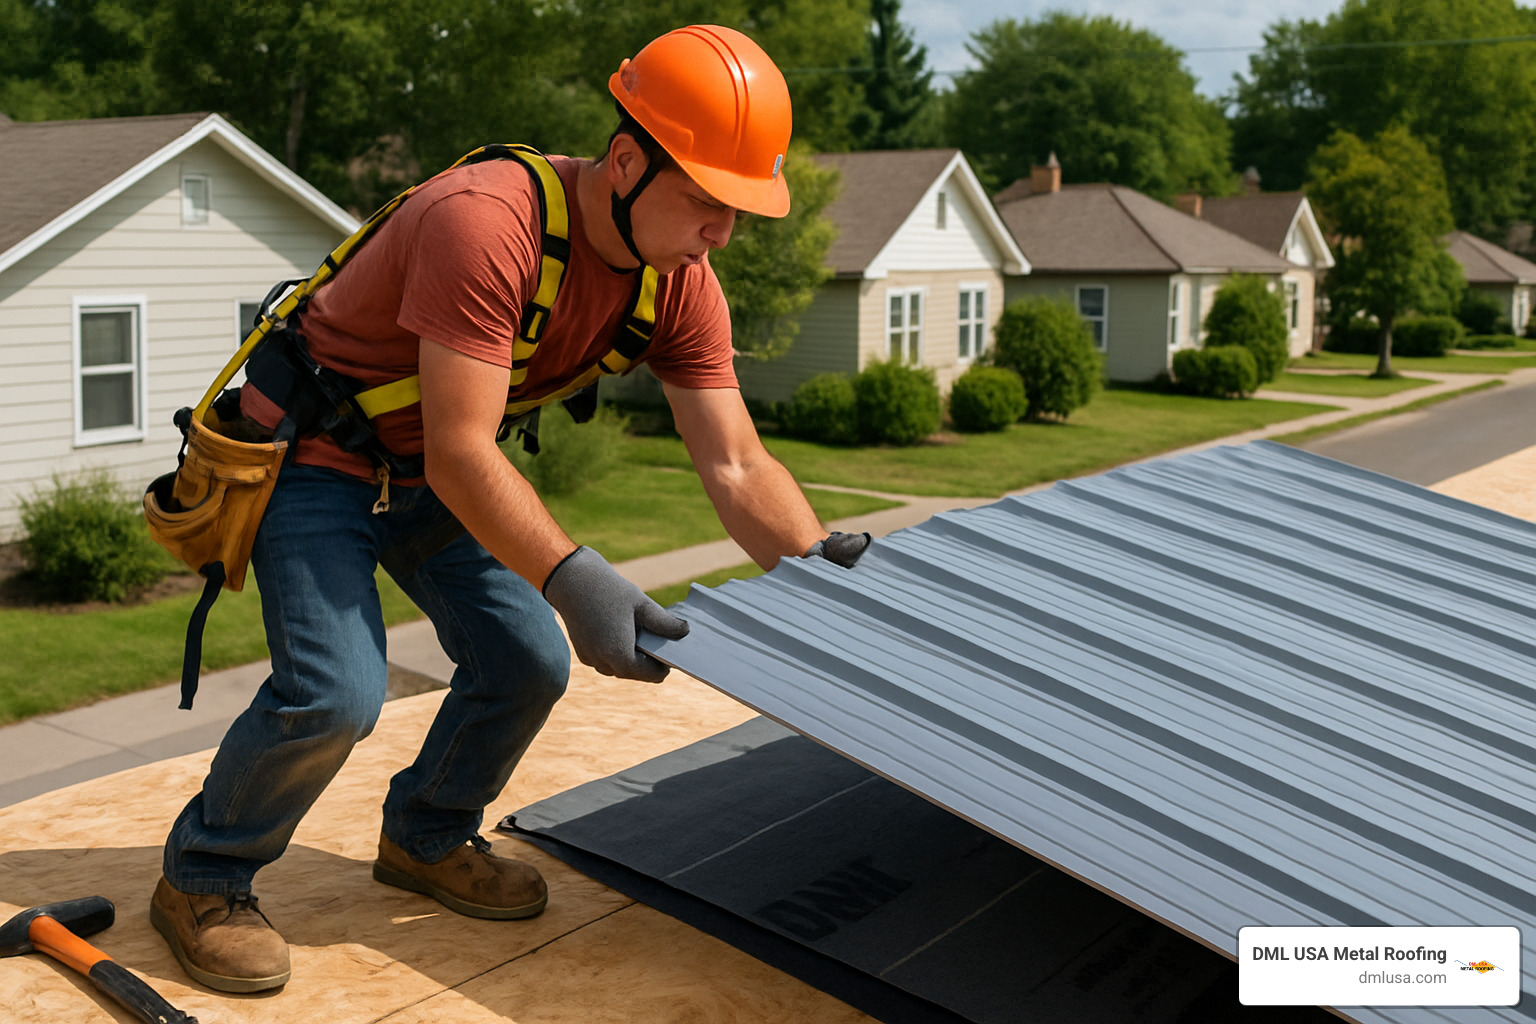
Safety First
I can’t emphasize this enough—roof work is inherently dangerous. Fall protection isn’t optional; it’s essential. A quality safety harness anchored to a secure point costs far less than a hospital bill—or worse.
Always wear cut-resistant gloves (those metal edges are surprisingly sharp) and eye protection when cutting panels. Choose proper footwear with soft soles and good traction to prevent slipping. The buddy system works wonders too—having someone on the ground as a spotter can literally be a lifesaver.
“I watched my neighbor try to install his own metal roof without proper safety gear,” one of our Springfield customers told me. “He slipped and barely caught himself. The next day, I saw him with a brand-new harness and roof anchors. Sometimes we learn the hard way, but it’s better to learn from others’ close calls.”
Be smart about weather awareness—never work on a wet, icy, or windy day. Metal panels can become sails in strong winds, pulling you right off the roof. And speaking of getting on the roof, ladder safety is crucial. Secure your ladder properly and use stabilizers to prevent wobbling.
Before starting your installation, check local building codes and obtain necessary permits. Many Illinois municipalities have specific requirements for roofing projects. Compliance isn’t just about avoiding fines—it’s also about ensuring your new roof meets safety standards and won’t cause complications when you eventually sell your home.
How are metal roofs installed safely is just as important as how they’re installed correctly. Your beautiful new metal roof should never come at the cost of your health or safety.
Step-by-Step Metal Roof Installation (11-Step Guide)
Now that you understand the basics and have gathered your materials, let’s walk through the complete installation process. This 11-step guide covers everything from preparing your roof to the final inspection.
Step 1-5: Deck to First Panel
Step 1: Prepare the Roof Surface
The foundation of a great metal roof starts with what’s underneath. You’ll first need to decide whether to remove your existing roofing or install over it. While how are metal roofs installed can vary, we typically recommend removing old shingles for the best results. That said, you can install over one layer of asphalt shingles if your local building codes allow it and your deck is in good condition.
Begin by stripping away old roofing materials down to the deck. Take time to thoroughly inspect for any soft spots, water damage, or rotting wood—these issues won’t magically disappear under your beautiful new metal roof! Replace damaged sections and sweep the surface clean of debris. Your metal panels will follow the contours of what’s beneath them, so a flat, even deck is crucial for that professional-looking finish.
Step 2: Install the Underlayment
Think of underlayment as your roof’s second line of defense against moisture. This step is non-negotiable for a quality installation. Roll out your synthetic underlayment horizontally across the entire roof, starting at the eave and working upward. Each row should overlap the previous one by 4-6 inches—think of it like shingles on a rainy day, you want the water to cascade downward without finding its way inside.
For homes in Illinois where ice dams are common, add an extra layer of protection by installing ice and water shield along the first 24-36 inches from the eaves. As one of our DML USA customers in Chicago told us, “That ice and water shield saved our bedroom ceiling during last year’s brutal freeze-thaw cycles!”
Step 3: Install Drip Edge
The drip edge might seem like a small detail, but it plays a mighty role in directing water away from your fascia and into your gutters. Install it along the eaves first, then tackle the rakes (the sloping edges of your gables). Secure the drip edge with roofing nails every 12-16 inches, making sure to overlap sections by at least 2 inches. A small bead of sealant at these overlaps provides extra protection against water intrusion.
Step 4: Plan Panel Layout
As the old carpenter’s adage goes, “measure twice, cut once.” This wisdom is especially true when planning your panel layout. Start at the gable end that faces away from prevailing winds (this reduces the chance of wind-driven rain getting under the panels). Measure one panel width from the roof edge and snap a chalk line from ridge to eave—this becomes your alignment guide.
To ensure your reference line is square, use the trusty 3-4-5 method: measure 3 feet along the eave, 4 feet up your reference line, and the diagonal between these points should be exactly 5 feet if your line is square. Taking time with this step ensures your panels will run straight and true across the entire roof.
Step 5: Position the First Panel
The first panel sets the tone for your entire installation. Position it carefully along your chalk line, ensuring it’s square to both the eave and ridge. Allow for a 1-2 inch overhang into the gutter (or up to 3 inches if you don’t have gutters) to ensure proper water runoff. Place foam closure strips at the eave to create a weather-tight seal and prevent insects from making homes under your new roof.
Before driving a single fastener, step back and verify the panel’s alignment. This extra minute of checking can save hours of frustration later.
Step 6-11: Fasten, Flash & Finish
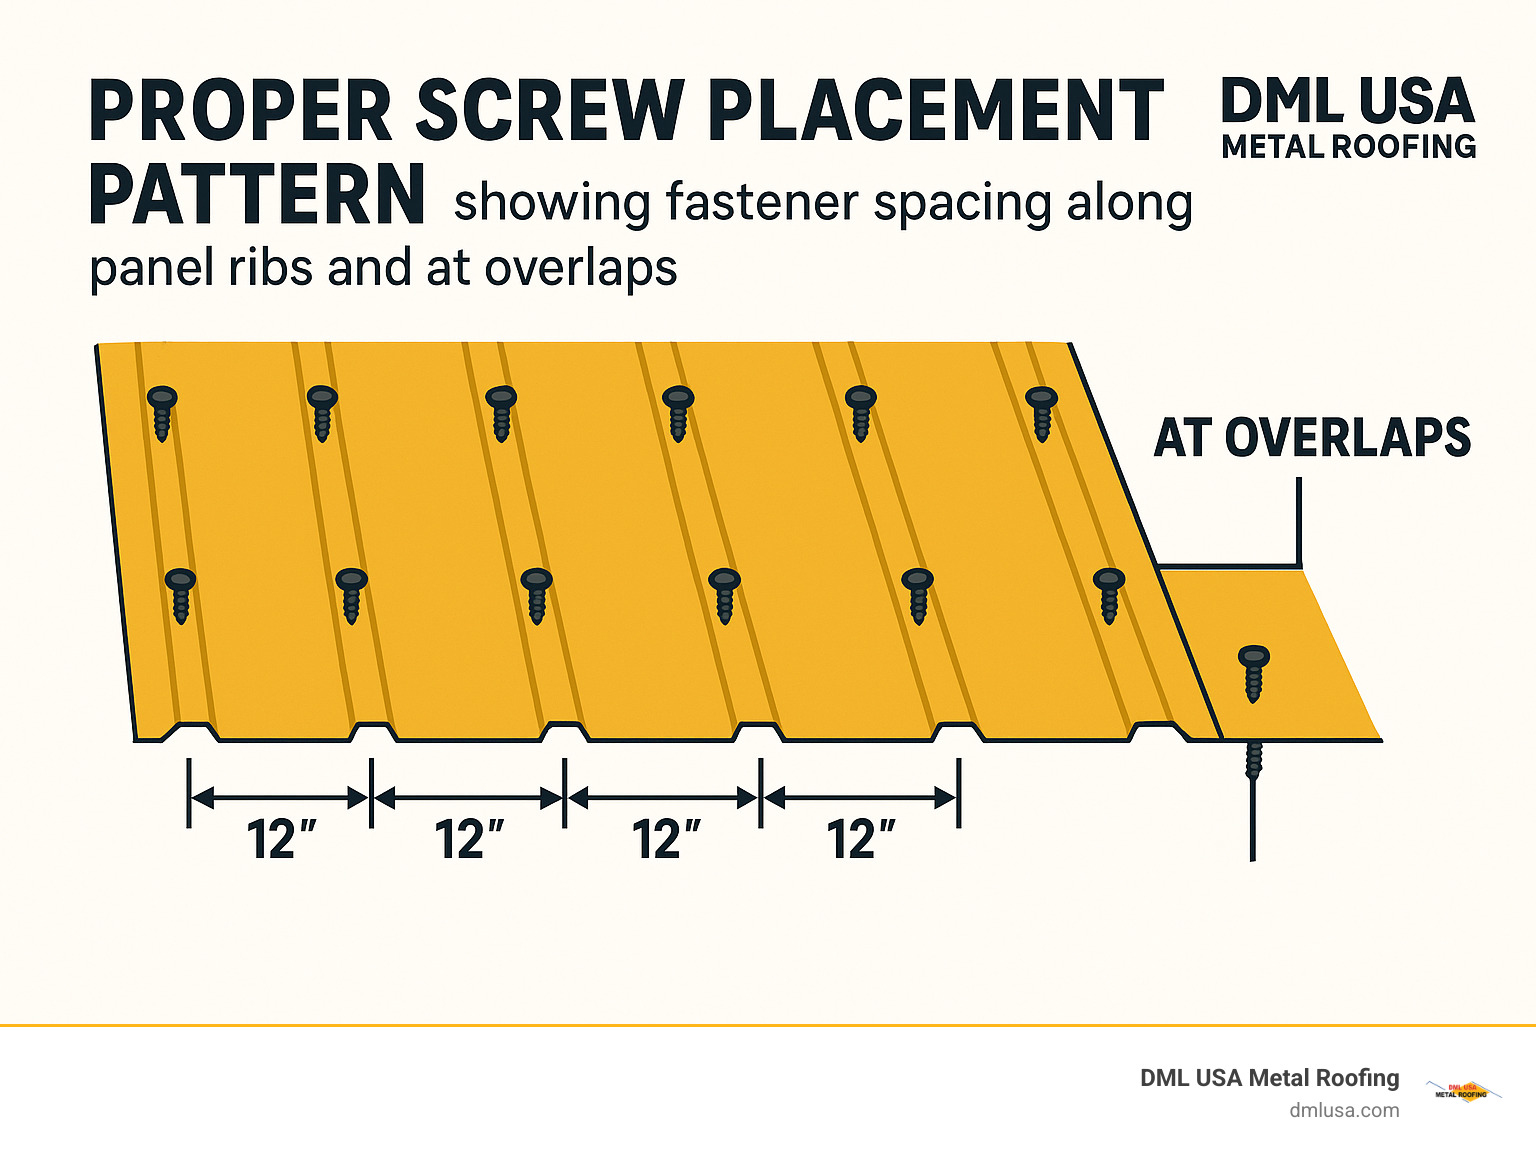
Step 6: Secure Panels with Fasteners
Proper fastening is where many DIY installations go wrong. How are metal roofs installed correctly hinges on this critical step. Use screws with neoprene washers specifically designed for metal roofing—they’ll create a watertight seal while allowing for the natural expansion and contraction of the metal.
Drive screws straight down, not at an angle, and tighten just enough to compress the washer without dimpling the metal. Think “snug, not squished.” Space your fasteners every 12-24 inches along panel ribs according to your manufacturer’s specifications. If you’re installing standing seam profiles, you’ll use a clip system instead of exposed fasteners for a cleaner look and better weather resistance.
Step 7: Overlap the Panels
As you continue installing panels across your roof, proper overlap is essential for keeping water out. Follow your manufacturer’s specifications for side laps (typically one rib overlap). For roofs requiring end laps where one panel meets another lengthwise, overlap by at least 6 inches and apply butyl tape or sealant between the panels for a watertight seal.
Consistency is key here—maintain the same overlap width across your entire roof for a uniform appearance and reliable performance. As one of our professional installers likes to say, “Water is persistent—it will find any weakness in your overlaps.”
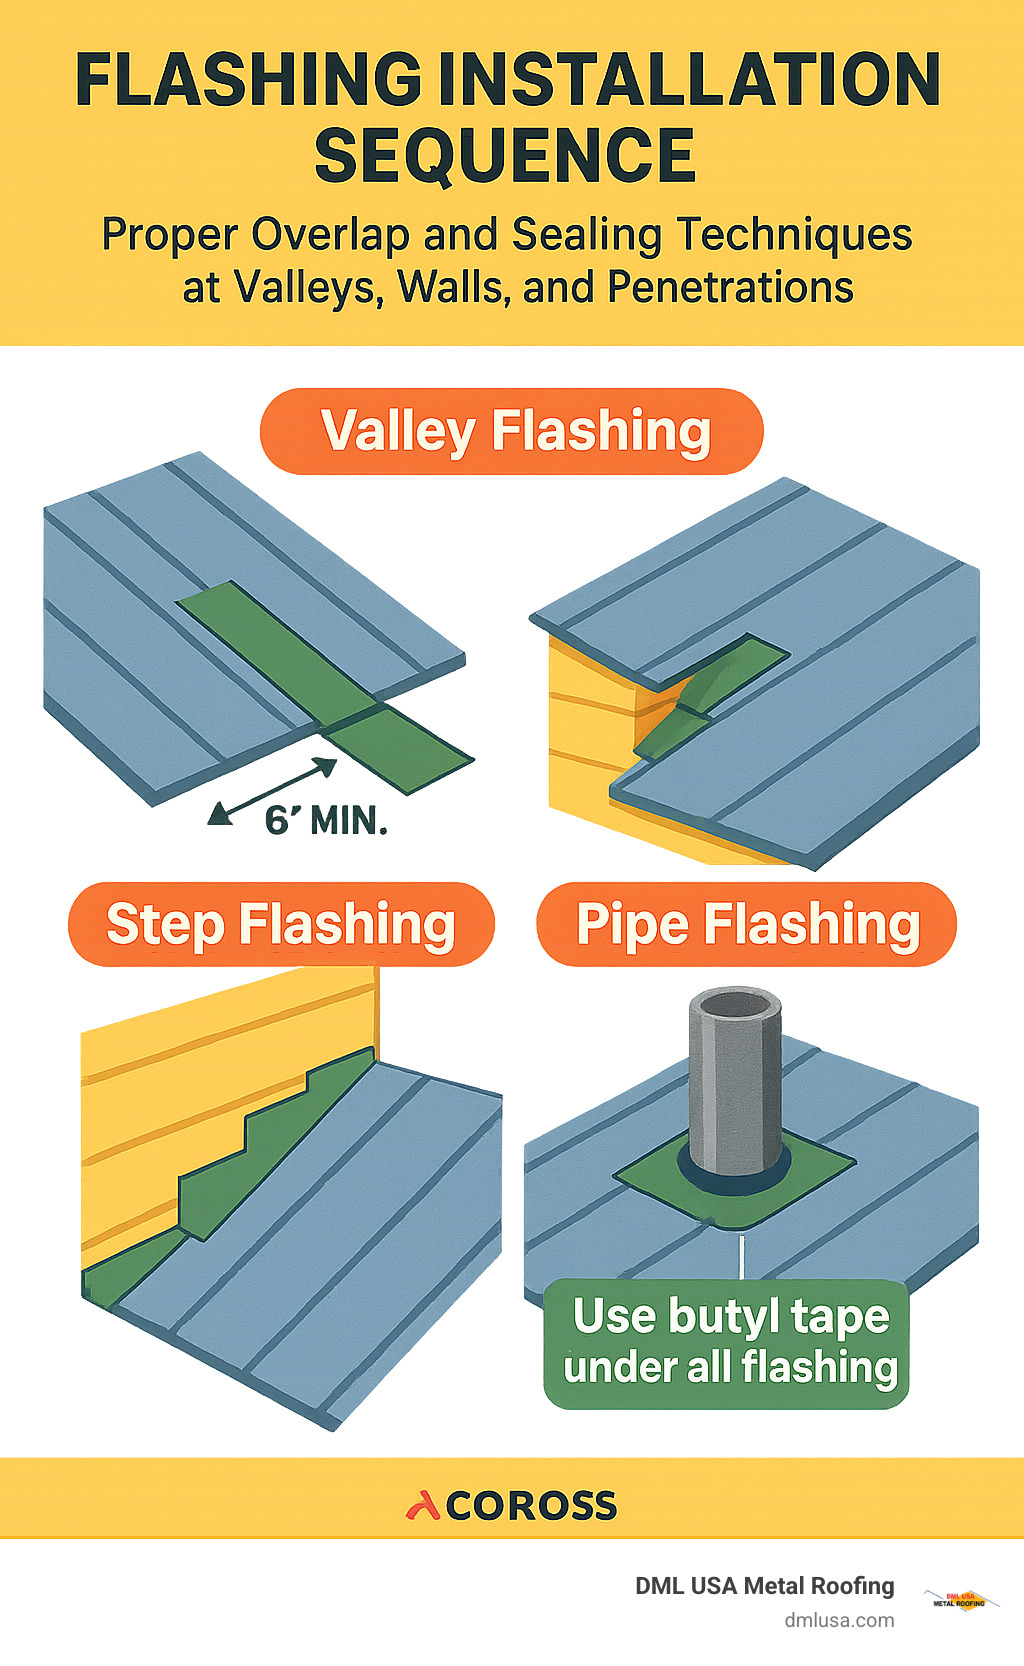
Step 8: Install Flashing
Flashing is your roof’s first line of defense at vulnerable transitions and penetrations. Install valley flashing where roof planes meet, step flashing where the roof meets walls, and appropriate pipe boots around vent pipes. These critical components direct water away from potential entry points.
Apply sealant at all flashing joints, but sealant is a secondary defense—proper installation of the flashing itself is your primary protection against leaks. Pay special attention to valleys, as they channel large volumes of water during heavy rain.
Step 9: Cover the Rake Edge
The rake trim not only provides a finished appearance to your gable edges but also protects them from wind uplift and water intrusion. Install rake trim over the panel edges at gable ends, securing with screws approximately every 12 inches. Apply butyl tape under the trim for added weather protection, and carefully trim to fit at ridge intersections for a clean, professional finish.
Step 10: Secure the Ridge Cap
The ridge cap is both functional and decorative, finishing the peak of your roof while protecting it from the elements. Install outside foam closure strips about 4 inches from the peak to prevent water and pest intrusion. Place the ridge cap over these closures and secure with screws through every rib. Where ridge cap sections meet, overlap them by at least 6 inches for continuous protection.
Step 11: Final Inspection and Cleanup
Before calling your project complete, perform a thorough inspection of your new metal roof. Check that all fasteners are properly installed—not too tight, not too loose. Verify that all trim pieces are secure and sealed. Remove any metal shavings from cutting (they can cause rust spots if left on the roof), and clear all debris from the roof surface and gutters.
“The most common mistake we see is improper fastener installation,” notes our head installer at DML USA. “Either screws are over-tightened, causing the metal to dimple, or they’re driven at an angle, compromising the rubber washer’s seal. Take your time with this step—it’s crucial for a watertight installation.”
I’ve seen homeowners rush through the final inspection only to find issues during the first rainstorm. A methodical, careful approach pays dividends in the long run. Your new metal roof is an investment that should protect your home for decades to come—those extra minutes spent double-checking your work are well worth it.
Sealing the Deal: Underlayment, Flashing, Ridges & Valleys
The difference between a metal roof that lasts for decades and one that leaks after the first heavy rain? It’s all in the details. When we talk about how are metal roofs installed properly, the waterproofing elements are where professional installers truly earn their keep.
Think of your metal roof as a shield, with several layers of protection working together. The underlayment, flashing, and proper sealing at ridges and valleys form your home’s defense system against Mother Nature’s worst.
Best Practices for Waterproofing
When I’m training new installers at DML USA, I always emphasize that water will find any weakness in your roof system. That’s why we’re meticulous about every overlap, fastener, and strip of sealant.
For underlayment, synthetic materials have revolutionized metal roofing. Unlike old-school felt paper that can deteriorate under metal’s heat, today’s synthetic underlayments withstand high temperatures while providing superior moisture protection. Always overlap horizontal seams by 4-6 inches and vertical seams by 6-12 inches. And please, use cap nails instead of staples – those tiny staples can back out over time, creating pathways for water.
Proper flashing is your roof’s first line of defense at vulnerable transitions. Valley flashing should extend at least 6 inches on each side to channel water safely down the roof. When installing step flashing where roof meets wall, remember the “shingle principle” – each piece should tuck under the siding but over the roofing panel. This creates a waterfall effect that naturally directs water downward.
Matching metals matters. I once saw a beautiful copper roof ruined because the installer used galvanized steel flashing. The different metals created galvanic corrosion, essentially eating holes through the panels. Always use flashing made from the same material as your roofing panels.
Sealants and tapes provide a secondary defense system. Apply two rows of butyl sealant tape on all end laps where panels overlap vertically. Use high-quality silicone or urethane sealants specifically formulated for metal roofing – not the general construction caulk from the hardware store. Though, sealant should be your backup plan, not your primary waterproofing strategy. Proper overlaps and flashing should do the heavy lifting.
Those foam closure strips might seem insignificant, but they’re crucial for preventing water infiltration and keeping critters out. These strips, shaped to match your specific panel profile, create a custom seal at eaves, ridges, and wall intersections. Secure them with butyl tape to prevent shifting, and choose vented or solid options depending on your ventilation needs.
“The closure strips made all the difference on our home,” shared Marcus from Springfield. “During our first spring with the new metal roof, we watched our neighbor’s traditional roof develop ice dams while ours stayed dry and problem-free. Those little foam pieces are worth their weight in gold!”
When it comes to fasteners, the humble screw can make or break your installation. Use screws with EPDM rubber washers designed specifically for metal roofing. Drive them perfectly perpendicular to the surface – not at an angle – and tighten until the washer compresses just 30-50%. Too tight causes dimpling that can leak; too loose won’t create a proper seal. I tell our customers to imagine squishing a marshmallow halfway – that’s your goal.
For our Illinois customers, snow guards are non-negotiable. These small devices prevent dangerous snow avalanches that can tear off gutters or injure someone walking below. Install them strategically above entrances, walkways, and valuable landscaping. Space them according to the manufacturer’s recommendations based on your roof pitch and local snow load. And yes, attach them with proper fasteners and sealant to maintain your roof’s integrity.
“We learned the hard way about the importance of proper sealing,” shares a homeowner from Northlake. “Our first installer didn’t use closure strips at the ridge, and we had water intrusion during heavy rains. After DML USA fixed the installation with proper closures and sealant, we haven’t had a single leak in five years.”
These details might seem tedious, but they’re what separate a professional installation from a future headache. When done right, your metal roof will keep your home dry through decades of Illinois weather extremes.
Special Scenarios: Installing Metal Over Shingles, Low Pitches & Complex Roofs
Metal roofing shines in versatility, but some installation situations need a bit more finesse. Whether you’re looking to save on tear-off costs, working with a shallow roof pitch, or tackling a roof with architectural flair, we’ve got you covered with specialized approaches.
Metal Roof Over Shingles Method
The ability to install metal roofing directly over existing asphalt shingles is one of its most practical advantages. This approach can save you considerable time, mess, and disposal costs when done correctly.
Before You Start:
First things first – check with your local building department. Many Illinois municipalities limit the number of roofing layers allowed, typically to two. Your existing roof deck must also be structurally sound to handle the additional weight of the metal roofing system. And take a good look at those shingles – they should be relatively flat and not curling, buckling, or severely deteriorated.
A homeowner in Springfield told us, “I was dreading the mess and expense of tearing off my old shingles. Being able to install my new DML USA metal roof right over them was a game-changer for my budget and my yard!”
You have two main approaches when installing how are metal roofs installed over existing shingles:
The simplest method involves laying a quality synthetic underlayment directly over the clean, existing shingles. This creates both a moisture barrier and prevents the metal from directly contacting the abrasive shingle granules. You’ll need longer fasteners that can penetrate through the metal, underlayment, shingles, and securely into the deck below.
For an even better installation, consider the furring strip method. Here, you’ll install 1×3 or 2×2 wooden strips perpendicular to your intended panel direction, spaced 16-24 inches apart. These strips create an even attachment surface and provide a beneficial ventilation space between your old and new roofs. One Peoria customer noted, “After installing our metal roof with furring strips over the existing shingles, our upstairs rooms stay noticeably cooler during summer heatwaves.”
Low-Slope & Complex Geometry Tips
Metal roofing can accommodate challenging roof designs, but proper techniques are crucial for success.
For low-slope applications (those with a pitch less than 3:12), standing seam profiles are your best choice. These panels feature raised seams that sit well above the water line, creating more effective barriers against moisture intrusion. For these installations, mechanical attachment systems using concealed clips rather than exposed fasteners provide superior water resistance.
When working with very low slopes (1:12 to 2:12), consider mechanically seamed panels where the edges are actually crimped together with special tools. Also, don’t skimp on underlayment – double or even triple layers provide essential backup protection. Every panel overlap should receive butyl tape sealant for maximum water resistance.
According to the latest NRCA guidelines: “For slopes less than 3:12, a hydrostatic (water-barrier) panel system should be used rather than a hydrokinetic (water-shedding) system.” In plain English, this means choosing panels designed to block water rather than merely shed it.
Homes with complex roof geometry – multiple dormers, valleys, hips, or curved elements – present unique challenges. For these architectural masterpieces, direct-to-deck installation typically offers better precision and a cleaner finished appearance. The ability to custom-cut panels on site allows installers to create perfect fits around complex features.
“When we tackled a Victorian home restoration in Oak Park,” shares one of our professional installers, “we used DML USA standing seam panels with concealed fasteners. The panels were custom-cut to work around six dormers and three chimney penetrations. The finished roof looks stunning and provides superior protection.”
For truly complex roofs, consider these professional techniques:
- On-site roll forming creates custom-length panels that eliminate horizontal seams
- Flexible flashing membranes conform to irregular penetrations and transitions
- Detailed panel layout planning minimizes visible cut edges
- Custom fabricated flashings address unique roof-to-wall intersections
Complex roofs require more time for careful fitting and cutting. The extra effort pays off with a roof that not only protects but improves your home’s architectural character.
When your roof presents special challenges, trust DML USA Metal Roofing to provide both the quality materials and installation guidance to ensure a successful outcome. Our team has helped Illinois homeowners overcome countless roofing complexities with durable, beautiful metal solutions.
Maintenance, Costs & DIY vs. Pro Decisions
Let’s talk about what happens after your beautiful metal roof is installed – because while we love to say “set it and forget it,” that’s not entirely accurate (though it’s pretty close!).
Metal roofing represents one of the best long-term investments you can make in your home. Yes, you’ll pay more upfront than you would for those traditional asphalt shingles, but the math works strongly in your favor over time.
“I was initially shocked at the price difference,” admits Frank from Springfield, “but when my neighbor had to replace his asphalt roof for the second time while I’m still enjoying my original metal roof 25 years later, I realized I actually saved thousands.”
The lifetime value of metal roofing is truly impressive. While you’ll invest two to three times more initially, your metal roof will outlast asphalt by decades – typically lasting 40-70 years compared to just 15-20 years for asphalt. Add in minimal maintenance requirements, potential cooling cost savings of up to 25%, possible insurance discounts for the improved fire and impact resistance, and increased home resale value (typically 1-6% higher), and the value proposition becomes clear.
What does a metal roof really cost?
For a typical 2,000 square foot home in Illinois, here’s what you might expect to pay:
- Basic corrugated steel panels: $12,000-$20,000 installed
- Standing seam steel or aluminum: $20,000-$30,000 installed
- Premium metals like copper or zinc: $30,000-$50,000+ installed
These figures include materials, labor, underlayment, trim and basic accessories. That roof complexity, removing existing materials, or structural work will add to these costs.
As Mary from Chicago told us, “The quote seemed high until I calculated what I’d spend on three asphalt roofs over the same timeframe – not to mention the hassle of multiple replacements and the peace of mind knowing my metal roof can handle whatever our wild Illinois weather throws at it.”
Keeping your metal roof in top shape
While how are metal roofs installed matters tremendously for longevity, proper maintenance ensures you’ll get the maximum life from your investment. The good news? Metal roofs are remarkably low-maintenance – though not completely maintenance-free.
Here’s a simple maintenance schedule to follow:
- Perform an annual visual inspection for loose fasteners or sealant issues
- Clear debris from valleys and gutters seasonally (especially after fall)
- Wash with mild soap and water if needed (avoid pressure washing which can damage finishes)
- Touch up any scratches promptly with matching paint to prevent corrosion
- Ensure gutters are clean and functioning to prevent water backup against the roof edge
“I spend maybe an hour each spring checking my roof and cleaning the gutters,” says Tom from Peoria. “Compare that to my previous asphalt roof that needed regular repairs and shingle replacements – it’s night and day.”
Should you DIY or hire professionals?
This is perhaps the biggest decision after choosing metal roofing. While the DIY route can save you 30-50% on labor costs, it comes with significant trade-offs.
Professional installation typically offers better warranties (covering both materials and workmanship), faster completion (usually 2-5 days for an average home), and the expertise that comes from installing hundreds of roofs. Professionals also have the specialized tools and safety equipment required, and their work generally won’t affect your home insurance coverage.
DIY installation makes the most sense for simpler structures like sheds, garages, or workshops with straightforward roof designs. For your main home – especially with complex rooflines, multiple stories, or steep pitches – professional installation is typically the wiser choice.
“After watching countless tutorial videos, I decided to install metal roofing on my workshop myself,” shares a DIY enthusiast from Chicago. “It took me two weekends, but I saved thousands. For my actual home, though, I hired DML USA’s recommended installers—the complexity and height of the roof made professional installation worth every penny.”
Common Mistakes to Avoid
Even professionals can make mistakes if they’re not experienced with metal roofing. Here are the issues we see most frequently:
Oil canning is that wavy appearance sometimes visible in flat areas of metal panels. It’s usually caused by improper panel storage, uneven roof decking, over-tightened fasteners, or using panels that are too wide for the application. While primarily aesthetic, severe oil canning can create water collection points.
Fastener problems are perhaps the most common issue. Over-tightened screws will dimple the metal and break the rubber washer seal, while under-tightened screws allow movement and leaks. Using the wrong screw type or length can also lead to failures.
Galvanic corrosion occurs when dissimilar metals come into contact with moisture. Never let copper touch steel or aluminum, and always use fasteners specifically designed for your panel material. Be mindful of water runoff from one metal type onto another.
Improper panel overlap is an invitation for leaks. Insufficient side or end laps, missing sealant at overlaps, or reversed overlaps that catch rather than shed water can all lead to water intrusion.
For more detailed information about metal roofing resources, visit our website at DML USA Metal Roofing Resources.
“After 15 years in the business, I can tell you that almost every leak I’ve repaired could have been prevented with proper installation techniques,” says Adam from DML USA. “That’s why we’re so focused on training our recommended installers and providing detailed guides for DIYers.”
When properly installed and maintained, your DML USA metal roof will likely be the last roof you’ll ever need to buy for your home – and that’s a pretty comforting thought when you’re sheltering what matters most.
Frequently Asked Questions about Metal Roof Installation
What roof pitch is required for metal panels?
Thinking about a metal roof for your Illinois home? One of the first questions most homeowners ask me is about pitch requirements.
Most metal roofing systems need a minimum pitch of 3:12 – that means your roof rises 3 inches for every 12 inches of horizontal run. But what if your roof is flatter than that? Don’t worry, you’ve still got options:
For slopes between 2:12 and 3:12, I typically recommend standing seam panels with additional seam sealant. When you get down to the 1:12 to 2:12 range, you’ll want to consider mechanically seamed panels with extra waterproofing measures. And for those almost-flat roofs below 1:12? There are specialized systems designed specifically for these challenging situations.
Every panel profile has different requirements, so always check the manufacturer’s specifications. At DML USA, we’ve helped countless homeowners find the perfect solution for their specific roof pitch – from the steeper traditional homes in Chicago’s suburbs to modern flat-roofed designs.
Can I install metal roofing myself safely?
“Can I DIY this?” is probably the second most common question I hear. The honest answer? It depends on your experience, tools, and the complexity of your roof.
DIY installation is certainly possible if you have construction experience and the right equipment. I’ve seen many handy homeowners successfully install metal roofing on simpler structures like garages and sheds. But before you climb that ladder, consider these factors:
Safety must be your top priority – you’ll need proper fall protection, sturdy footwear with good grip, cut-resistant gloves, and eye protection. The physical demands are significant, involving heavy lifting, balancing on slopes, and working in awkward positions for extended periods.
You’ll also need specialized tools like quality metal shears, a panel cutter, and possibly seaming equipment. These aren’t typically found in the average homeowner’s toolbox. And don’t underestimate the skills required – precise measuring, straight cutting of metal panels, and following detailed installation instructions are all essential.
The complexity of your roof matters tremendously. A simple rectangular shed roof? Potentially DIY-friendly. Your multi-level home with dormers, valleys, and skylights? That’s where even experienced DIYers often call in the pros. And finally, consider the height – working on a single-story garage is much safer than a two-story house.
As one of our customers in Peoria told me after completing his workshop roof: “I’m glad I tried it on my shed first. It gave me the confidence to help with my house installation, but also the wisdom to know I needed professional help for the main job.”
How often should screws be inspected or replaced?
Taking care of your metal roof’s fasteners is like checking the tires on your car – a small maintenance task that prevents bigger problems down the road.
I recommend inspecting your metal roof’s fasteners once a year, ideally in spring after winter’s harsh conditions. During your inspection, look for loose screws that need tightening (but be careful not to overtighten!). Check for damaged rubber washers that might have cracked or deteriorated – these are your first line of defense against water intrusion. Keep an eye out for rust or corrosion around fastener heads, which could indicate a problem. And verify that screws remain properly driven straight into the surface, not at angles that compromise their sealing ability.
The good news? Quality screws with EPDM washers typically last 20+ years before needing replacement. However, on roofs with exposed fasteners (like many corrugated or R-panel systems), you might need to replace some screws with damaged washers every 10-15 years.
One advantage of standing seam systems that many of our DML USA customers appreciate is that the critical fasteners are concealed beneath the raised seams, protecting them from direct weather exposure and significantly reducing maintenance needs.
A Springfield customer recently shared: “After 12 years with my exposed-fastener metal roof, I only needed to replace about 20 screws where the washers had deteriorated. Compared to replacing an entire asphalt roof, this minor maintenance was a breeze!”
A little attention to these small details goes a long way toward ensuring your metal roof continues to protect your home for decades to come.
Conclusion
There’s something deeply satisfying about a well-installed metal roof—it’s not just a home improvement project, it’s an investment in peace of mind. Understanding how are metal roofs installed isn’t just technical knowledge; it’s the key to making smart decisions about protecting what matters most to you.
Think about it: the average homeowner replaces their asphalt roof 2-3 times during their homeownership. But a quality metal roof from DML USA? That could be the last roof you’ll ever need to install. As Mark from Chicago told us after 15 years with his metal roof: “It still looks as good as the day it was completed. No leaks, no maintenance issues—just peace of mind through every thunderstorm and blizzard.”
The numbers tell a compelling story too. Metal roofing typically increases property values by 1-6%, cuts cooling costs by up to 25%, and eliminates those frustrating replacement cycles that seem to come just when you least expect (or can afford) them. For Illinois homeowners facing our unique weather challenges—from Chicago’s fierce winds to summer heat waves and winter ice—a metal roof offers superior protection while often qualifying for reduced insurance premiums.
Beyond the practical benefits, there’s something to be said for the visual change. A new metal roof doesn’t just protect your home; it gives it character and distinction. Our customers often tell us how neighbors stop to admire their roofs, especially as years pass and their homes maintain that “just-installed” look while others in the neighborhood show wear and aging.
Metal roofing is truly the smart homeowner’s choice—an upfront investment that pays dividends for decades through improved durability, improved energy efficiency, and minimal maintenance requirements. Whether you’re building your forever home or upgrading the one you love, we believe you deserve roofing that works as hard as you do.
At DML USA Metal Roofing, we’re proud to manufacture high-quality, American-made metal roofing products right here in Illinois. Our systems are engineered specifically for Midwest weather conditions, offering exceptional resistance to whatever Mother Nature throws your way—be it fire, wind, hail, or snow.
Ready to explore how metal roofing can transform your home with beauty and performance that lasts a lifetime? Visit DML USA Products to find options that match your style, budget, and protection needs. Because a metal roof isn’t just a purchase—it’s a statement that you value quality, sustainability, and smart long-term thinking.
Your home deserves the best protection possible. With proper installation and minimal care, your DML USA metal roof will stand guard through countless seasons, keeping what matters most safe and secure beneath its durable surface.
