
Metal Roof Over Shingles: 7 Proven Steps for Lasting Success
Metal Roof Over Shingles: Fast Answers for a Long-Lasting Upgrade
Metal roof over shingles is a practical way to give your home a lifetime roof without the mess and cost of tearing off your old shingles. If you’re wondering if you can install a metal roof over shingles, here’s the quick answer:
| Question | Quick Answer |
|---|---|
| Can you put a metal roof over shingles? | Yes—if your shingles are in good shape, the deck is solid, and local building codes allow it. |
| What are the main benefits? | Lower cost, faster installation, less landfill waste, more durability, and higher energy efficiency. |
| Are there risks or drawbacks? | Possible hidden deck damage, condensation issues, or code limits if not properly inspected and installed. |
| Do you need a permit/inspection? | Nearly always. Always check your local requirements before starting. |
Thinking about a metal roof over shingles? You’re not alone. Many homeowners want a roof that lasts 40–70 years, cuts cooling costs, and stands up to storms—all without adding to the landfill. Even better, overlaying saves up to 25% on installation by skipping tear-off.
A homeowner once said,
“I’d rather install a metal roof over shingles than keep paying for repairs every few years. The savings and peace of mind are huge.”
This guide will break down the 7 essential steps to install a metal roof over shingles, plus safety tips and insider advice for a smooth, code-compliant project.
My name is Adam Kadziola. As the founder of DML USA Metal Roofing and an expert in metal roof over shingles installations, I’ve helped hundreds of homeowners choose strong, beautiful solutions that protect their families for decades. Now, let’s map out your upgrade.
Metal roof over shingles terms to know:
– can metal roof be installed directly over shingles
– how are metal roofs installed
What You’ll Learn
By the end of this guide you’ll know the key benefits, costs, and code requirements for installing a metal roof over shingles. We walk you through the 7-step installation process, the permits and tools you’ll need, and the warning signs that call for a full tear-off instead of an overlay. You’ll also pick up quick pointers on ventilation, condensation control, and long-term maintenance so your new roof delivers decades of reliable service.
Whether you’re still comparing options or ready to schedule a crew, use this article as a concise roadmap for a safe, code-compliant project that maximizes the value of DML USA Metal Roofing panels.
Assessing Your Existing Roof and Meeting Code
Here’s the truth: installing a metal roof over shingles can be a fantastic investment, but only if your existing roof can handle it. Think of this step as the foundation of your entire project—skip it, and you might end up with bigger problems than you started with.
The good news? Most roofs in decent shape are perfect candidates for a metal overlay. The key is knowing what to look for and being honest about what you find.
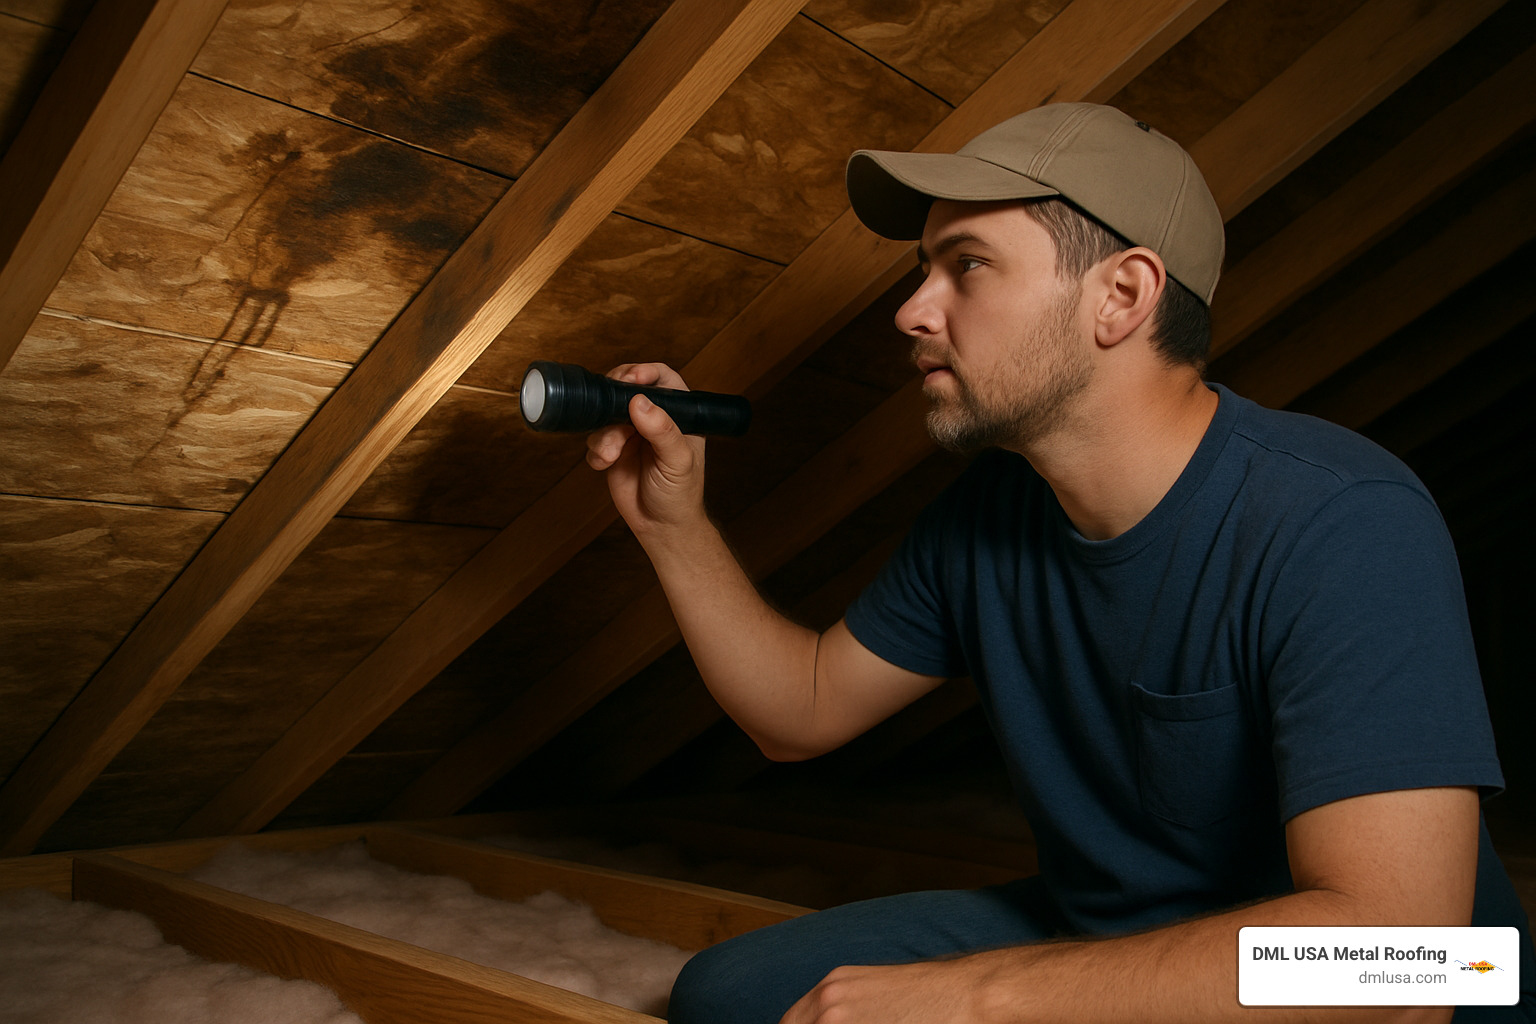
Start with a thorough inspection of your shingle condition. Walk around your house and look up. Are the shingles lying flat, or are they starting to curl at the edges? A few loose granules are normal, but if you’re seeing bare spots or shingles that look like potato chips, that’s a red flag.
Next, grab a flashlight and head into your attic. This is where the real detective work happens. Check your roof deck carefully for any signs of rot, water stains, or sagging. Press gently on the wood with a screwdriver—it should feel solid, not spongy. Dark stains or that musty smell? Those are clues that moisture has been sneaking in.
Load calculation might sound intimidating, but here’s the reassuring part: metal roofing is actually lighter than most people think. It typically weighs about one-third to half as much as asphalt shingles. Still, your roof structure needs to support both the old shingles and the new metal, plus handle snow loads if you live in areas that get winter weather.
Don’t forget about the two-layer rule. Most building codes, including the International Building Code that’s widely used across the country, allow a maximum of two roofing layers. If you already have two layers of shingles up there, you’ll need a complete tear-off before installing your metal roof.
Building permits are another non-negotiable step. Nearly every city and county requires permits for reroofing projects. The small permit fee is nothing compared to the headaches you’ll face if you skip this step and get caught.
If you’re feeling overwhelmed by the technical aspects, our Resources page has additional guidance to help you through the process.
Red Flags That Require Full Tear-Off
Some problems simply can’t be covered up, no matter how much we might want to. If you spot any of these issues, it’s time to have an honest conversation about a full tear-off instead of an overlay.
Curling shingles are the most obvious warning sign. When shingles start curling up at the edges, they create an uneven surface that makes it nearly impossible to install metal panels properly. You’ll end up with gaps, potential leak points, and a roof that just doesn’t look right.
Moisture stains in your attic tell a story you need to hear. Those dark patches on the wood decking mean water has been getting in, and there’s likely damage you can’t see yet. Installing new roofing over compromised decking is like putting a band-aid on a broken bone.
Sagging sheathing is a structural red flag that demands immediate attention. If you can see dips, bows, or areas where the roof deck feels spongy underfoot, that’s a sign the wood structure has been compromised. This isn’t just about aesthetics—it’s about safety.
Mold and insect damage create their own set of problems. Mold spreads, and insects like carpenter ants or termites can continue their destructive work even after you’ve covered everything with beautiful new metal panels.
Navigating Local Regulations
Every community has its own personality when it comes to building codes, and roofing is no exception. The key is understanding what applies to your specific situation.
IBC re-roofing rules form the backbone of most local codes. These regulations require that existing roofing be in sound condition before you can overlay, and they limit you to those two layers we mentioned earlier. The rules exist for good reasons—structural integrity and safety.
Wind zone maps and snow load charts help ensure your new metal roof over shingles can handle whatever Mother Nature throws at it. Different regions have different requirements based on local weather patterns.
Permit fees and inspection checkpoints vary widely from one area to another. Some communities have streamlined processes, while others require multiple inspections at different stages. Most building departments are helpful once you get them on the phone.
When you’re ready to dive deeper into the technical side, check out this scientific research on condensation control. Understanding how moisture behaves in roof assemblies can save you from expensive problems down the road.
This assessment phase isn’t about finding reasons to avoid your metal roof project—it’s about setting yourself up for success. A thorough evaluation now means decades of worry-free protection later.
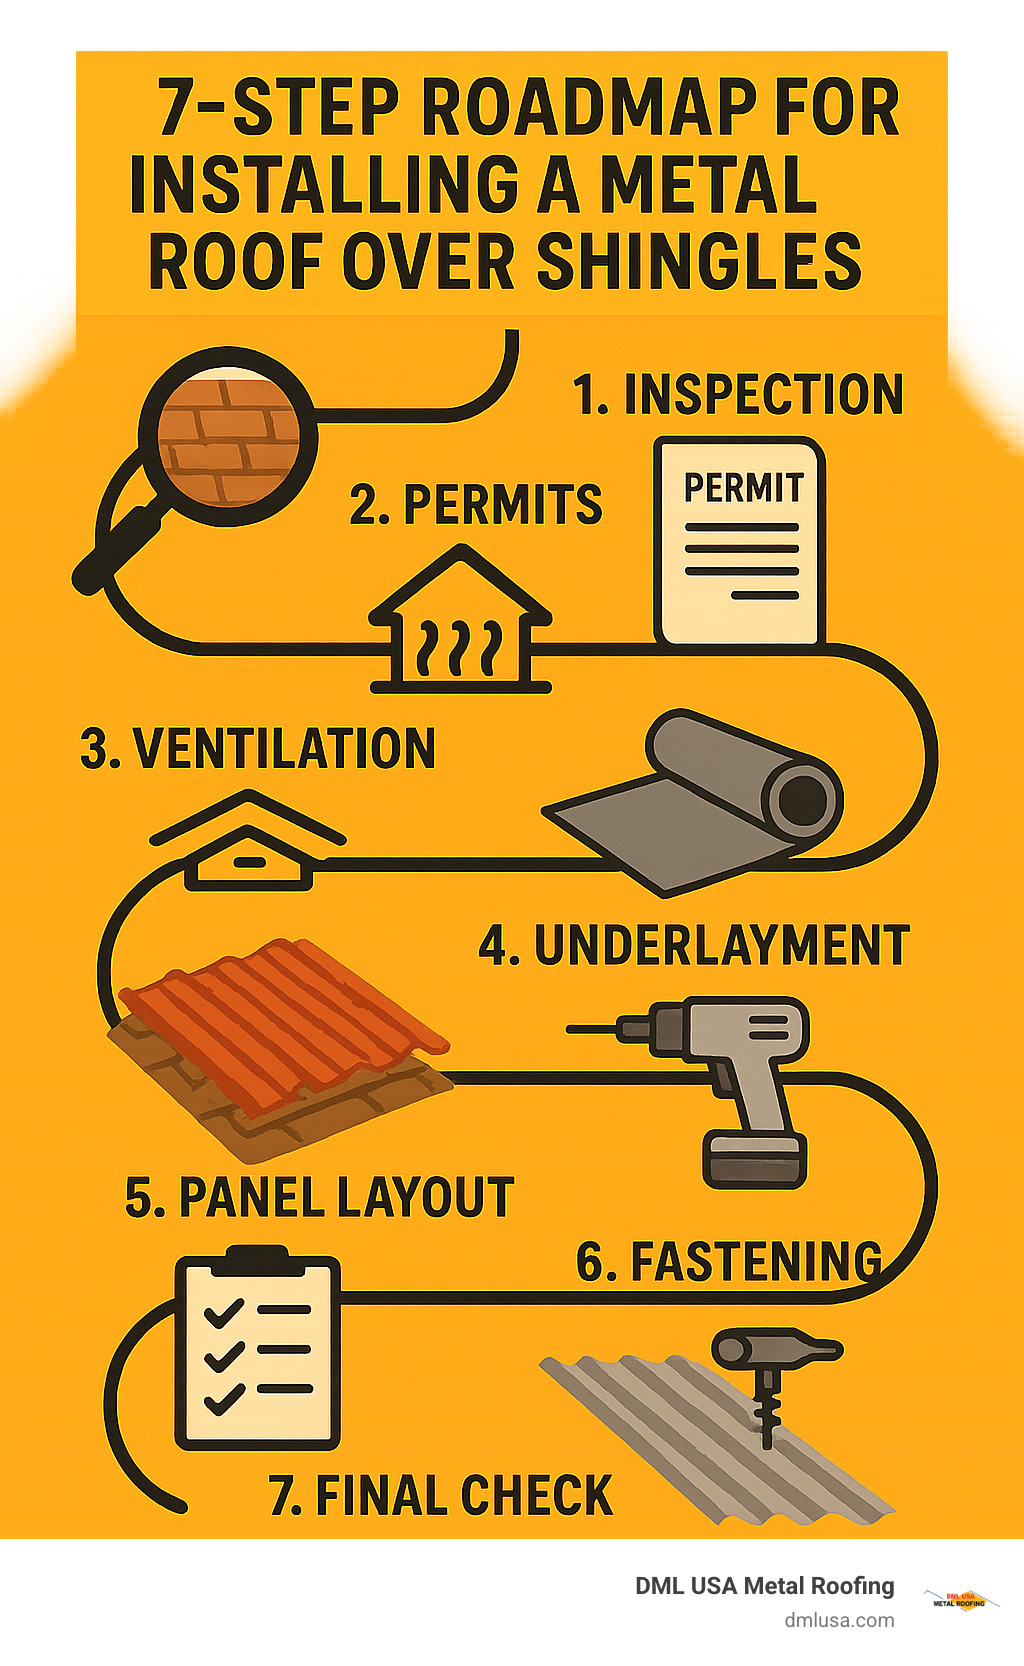
Metal Roof Over Shingles: 7-Step Installation Guide
Ready to give your home a fresh start with a metal roof over shingles? Here’s your step-by-step, stress-free guide to getting it done right. No shortcuts, no guesswork—just a proven process you can trust for years to come.
What is a Metal Roof Overlay?
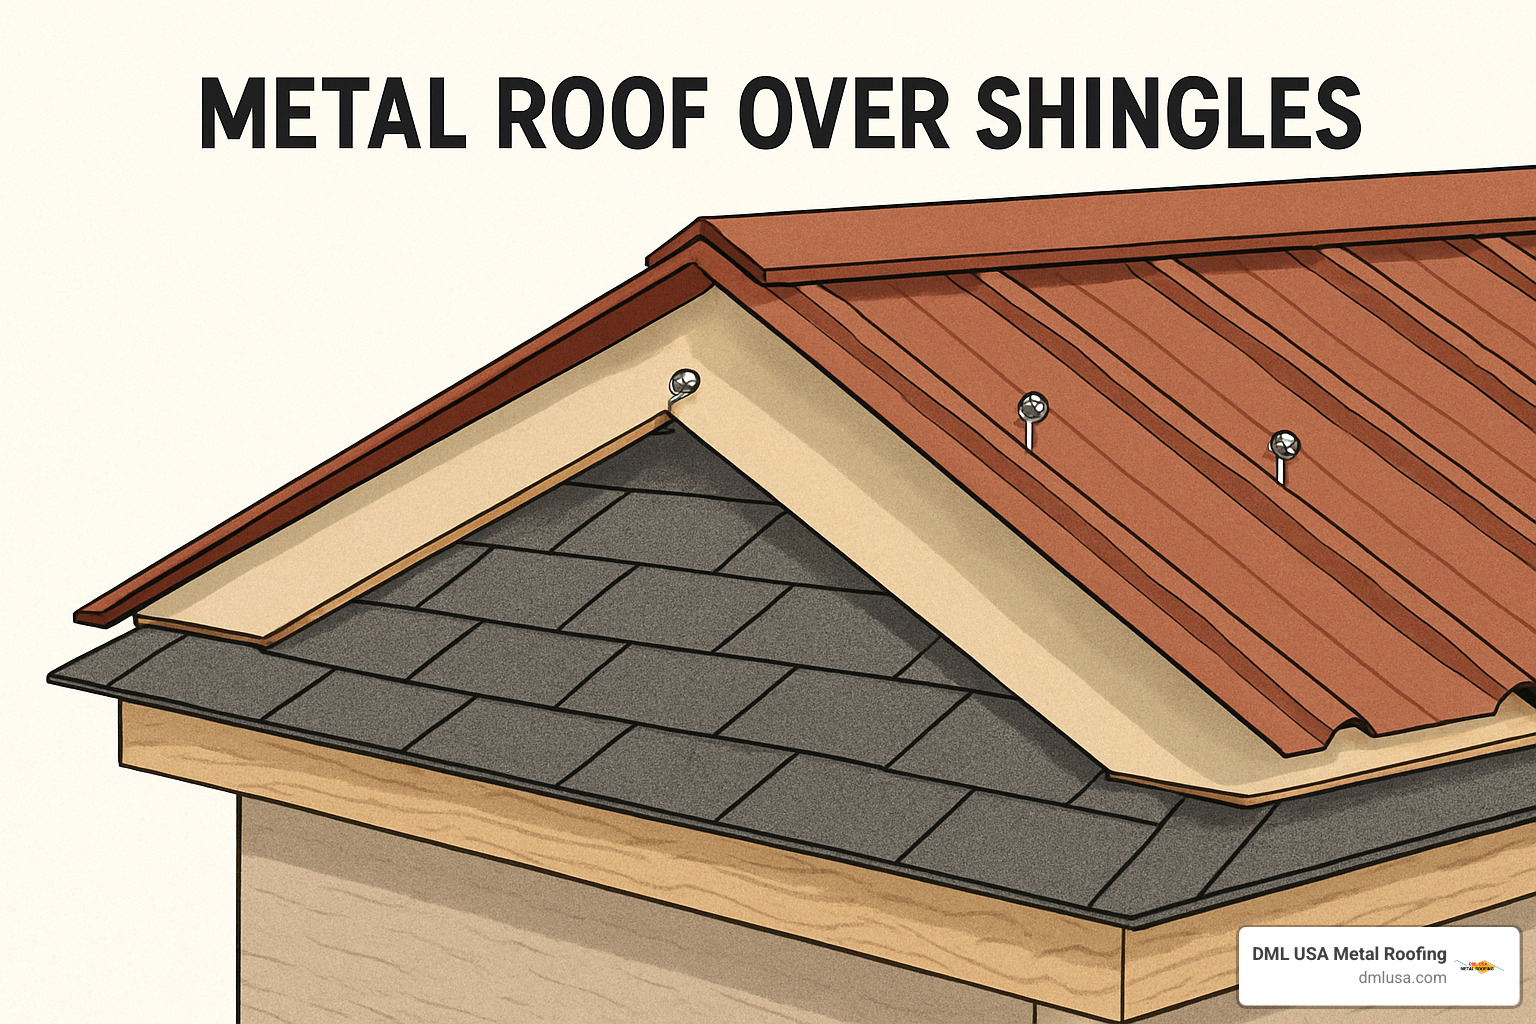
When you hear “metal roof over shingles” or “overlay,” it simply means you’re adding new metal roofing panels right on top of your existing shingles. It’s a bit like putting a sleek new jacket over your favorite shirt—extra protection, less waste. To do it right, you’ll need furring strips (or a spacer system) to create separation, and a special underlayment that protects both your old and new roof from moisture and wear.
Essential Tools & Materials
Gather your safety gear first—harness, roofing shoes, gloves, and eye protection. Then, have your measuring tape, chalk line, utility knife, screw gun or driver, and both metal and tin snips ready. For installation, you’ll need synthetic underlayment or ice-and-water shield, furring strips or another approved spacer system, and your chosen DML USA Metal Roofing panels (whether you love standing seam or stone-coated styles). Don’t forget the details: starter/drip edge, ridge vent, pipe boots, and a full flashing kit.
Curious about panel styles? Take a look at our Products page for inspiration.
Step 1 – Inspect & Repair the Deck
Begin by heading up to your attic and checking your roof deck. Look carefully for rotted or soft boards, and swap out any damaged sections you find. If you spot nail pops sticking up, hammer them down or replace them so you’re working with a smooth surface. Always double-check that your sheathing is at least 7/16″ thick. Skipping these repairs might save time now, but you’ll pay for it later!
Step 2 – Secure Permits & Confirm Load Capacity
Before you roll up your sleeves, it’s permit time. Apply for your local roofing permit—some municipalities want to review your project plans, so be ready with documentation. Next, confirm your roof structure can handle the combined weight of the old shingles, new metal panels, and any snow or ice you might get. If in doubt, have a qualified contractor or engineer check your trusses or rafters. Keep your permits and photos—all paperwork will make life easier for insurance or when you decide to sell.
Step 3 – Plan Ventilation & Condensation for a Metal Roof Over Shingles
Good ventilation is the secret to a long-lasting metal roof over shingles. Make sure you have a ridge vent at the peak, so hot air can escape, and soffit vents at the eaves, so cool air can flow in. If you’re installing furring strips (or purlins), you’re also creating an air gap (often called Above-Sheathing Ventilation, or ASV). This gap keeps your attic cooler and helps prevent summer heat buildup. For extra protection, add a vapor-permeable underlayment that blocks moisture but lets your roof “breathe.” If you’ve ever noticed your attic turning into a sauna in summer (or forming frost in winter), this step is for you!
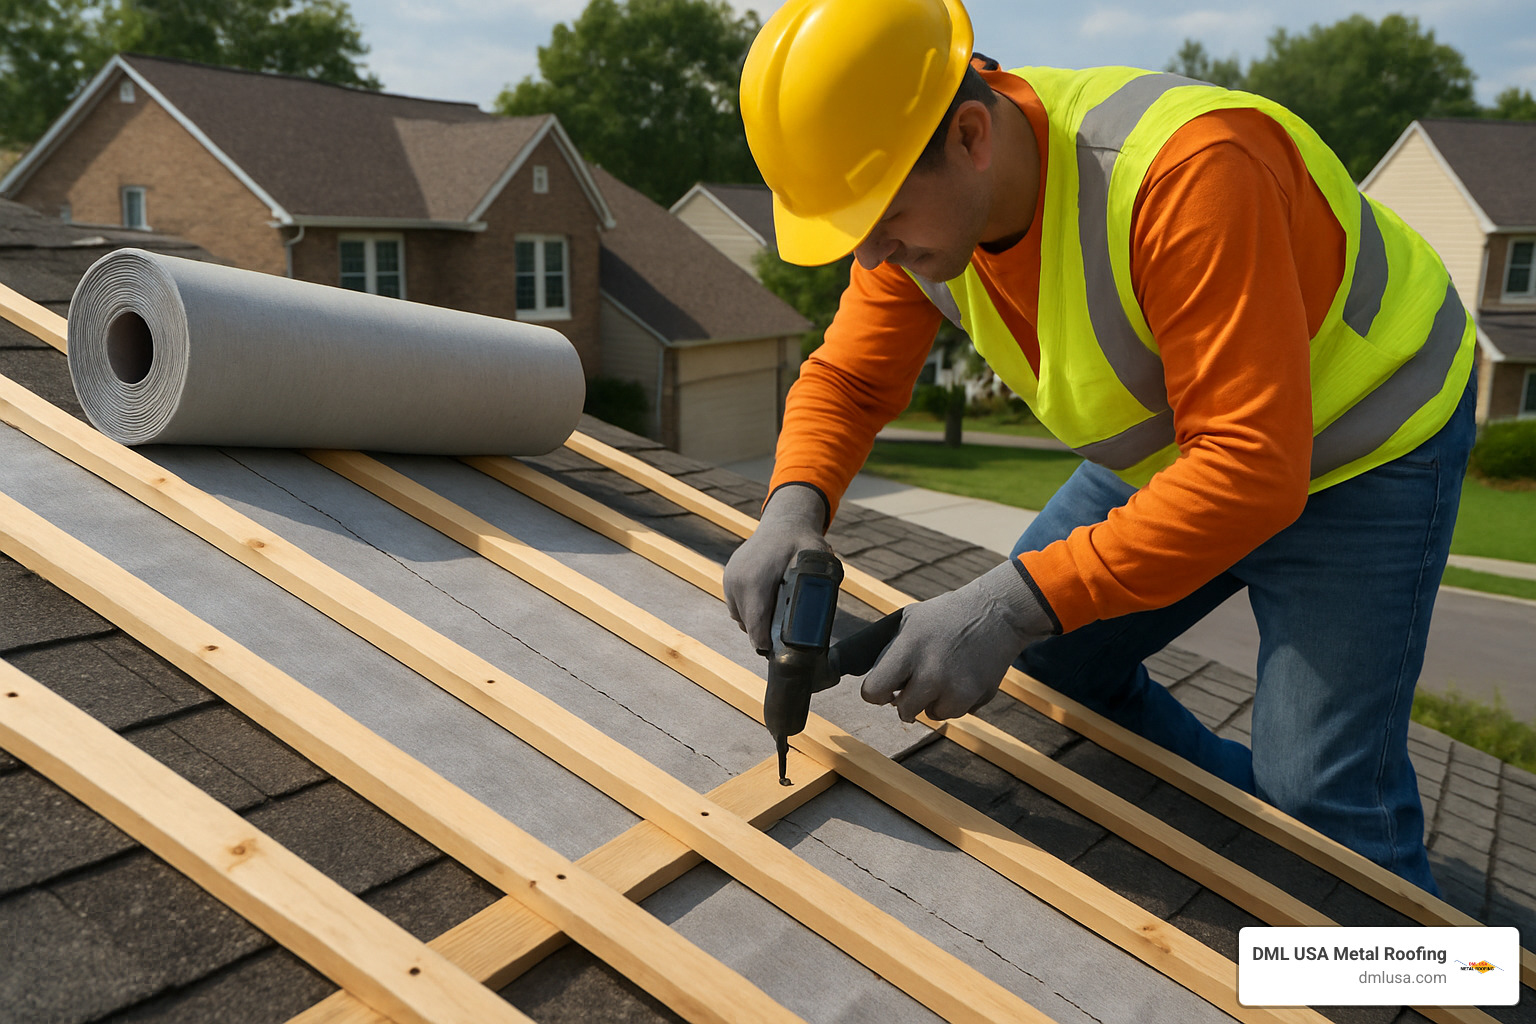
Step 4 – Install Underlayment & Spacer System
Now, roll out a high-quality synthetic underlayment or ice-and-water shield over the existing shingles. Overlap the edges by at least 6 inches for full coverage. Skip traditional felt—it tends to hold moisture, which you don’t want trapped under your new roof. Next, install furring strips (usually 1×4 or 2x4s) perpendicular to your rafters, spaced 16–24 inches apart. This creates a level surface for your metal panels and an essential air gap for ventilation. Some pros love advanced, non-wood spacers that resist warping—ask us for recommendations. Fasten everything with corrosion-resistant screws that reach through the shingles and into the roof deck.
Step 5 – Snap Chalk Lines & Set Starter Strips
Once your base is ready, grab your chalk line and snap straight, guide lines to keep everything square. Measure carefully from the eaves and ridge—crooked panels are a pain to fix later! Next, install your starter strips or drip edges along the eaves. Let them overhang by 1–2 inches for proper water runoff, but keep them tight so the wind can’t get underneath. Double-check that your overhangs are even on all edges for a crisp, clean look.
Step 6 – Attach Panels, Flashings & Trim
Time for the main event! Start your first metal panel along the straightest edge—usually an eave or gable. If you’re using standing seam, attach it with concealed clips. With exposed-fastener panels, always place screws in the flat part of the panel (not the rib) to avoid leaks. Don’t overtighten—just snug enough so the panel sits flat but isn’t warped. Then install valley pans, pipe boots, and all necessary flashing around any chimneys or skylights. Finish off with ridge, gable, and hip trim so water and wind stay out.
Remember: Always follow the manufacturer’s installation guide for your specific panel profile. Mistakes here can void your warranty—nobody wants that!
Step 7 – Final Inspection of Your Metal Roof Over Shingles
Almost done! Step back and check for straight, even panel rows from the ground. Inspect all seams for tightness and make sure no gaps are left behind. Clear any metal shavings or leftover debris to protect your new roof from corrosion. Last but not least: Register your DML USA Metal Roofing warranty to lock in years of peace of mind.
Once you’re finished, you’ll have a beautiful, durable metal roof over shingles that’s built to last—plus the peace of mind that you did it the right way from the start.
Preventing Condensation, Ventilation & Structural Load
Here’s where things get interesting—and where many DIY projects go sideways. A metal roof over shingles can last 40-70 years, but only if you handle the “invisible” stuff right: moisture, airflow, and structural stress.
Think of your roof like a living system. It needs to breathe, expand, contract, and shed water without breaking a sweat. Get this wrong, and you’ll have condensation dripping in your attic or panels buckling in the summer heat.
Humidity & Condensation Control
Thermal bridging is your enemy here. When warm, moist air from your house rises and hits a cold roof deck, you get condensation—and condensation leads to mold, rot, and unhappy homeowners.
The solution? Proper insulation on your attic floor keeps that warm air where it belongs. Add spacer mats or vented underlayment between your shingles and metal panels, and you’ve created an escape route for any moisture that does sneak in.
If you live in snow country, don’t forget snow retention systems. Without them, heavy snow can slide off your new metal roof like an avalanche, taking out gutters, landscaping, or anyone unlucky enough to be standing below.
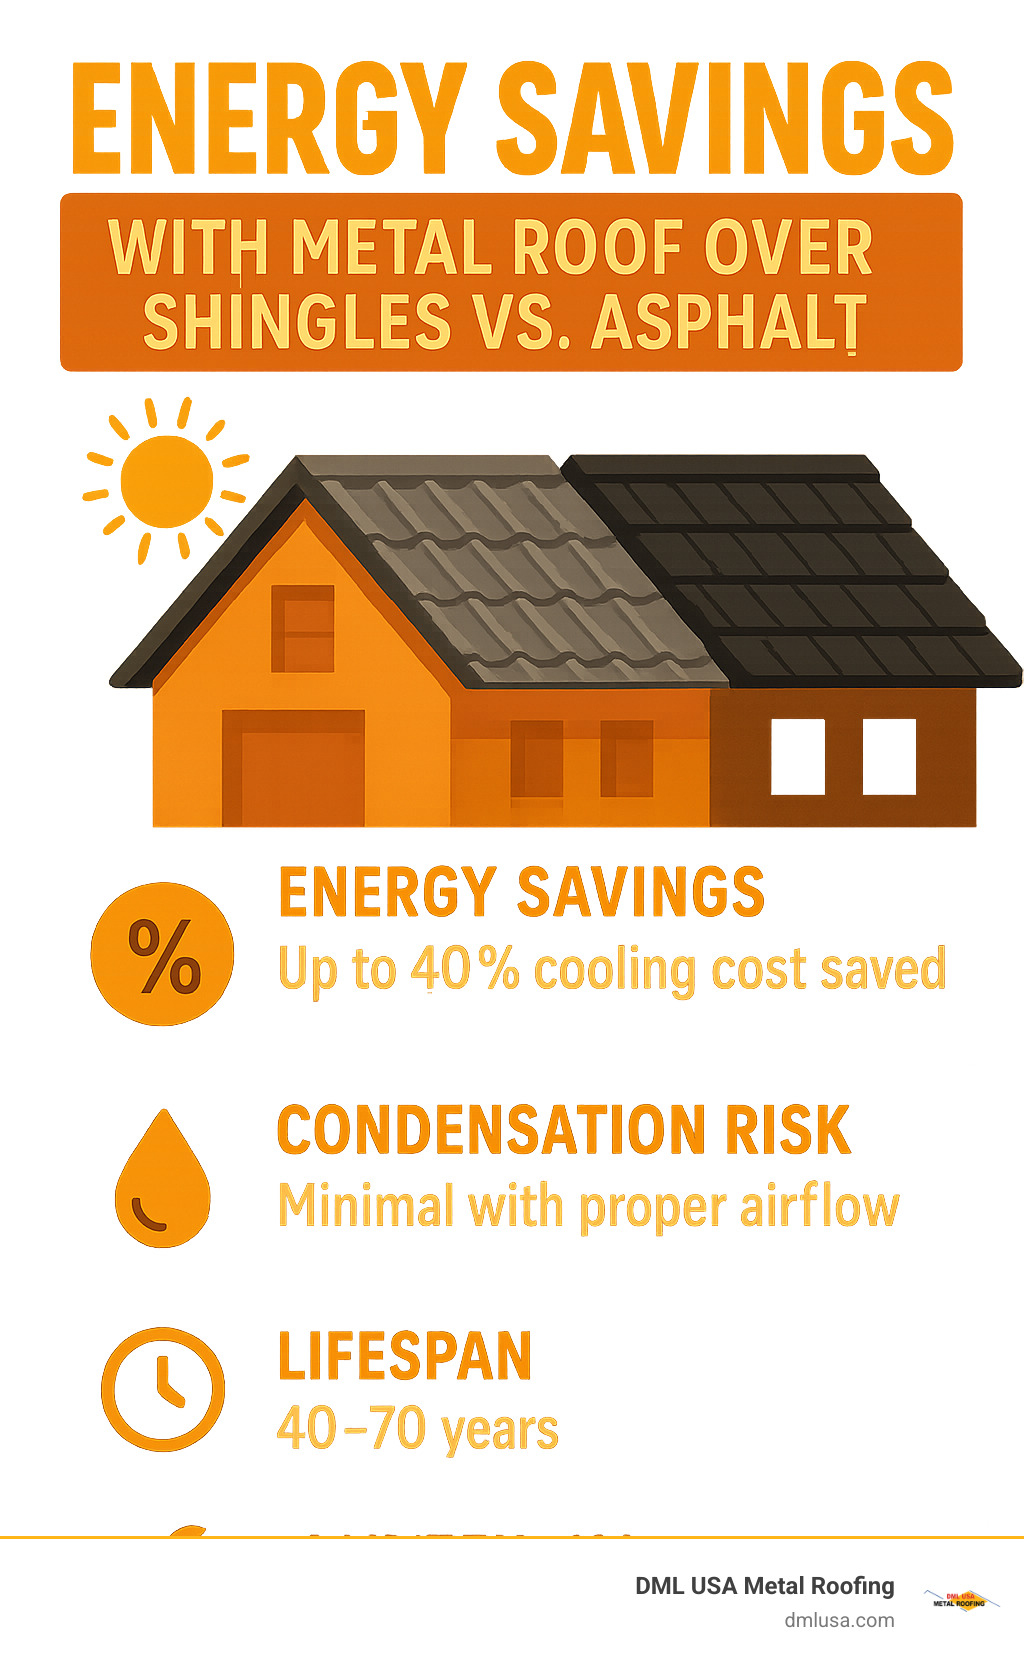
[TABLE] Ventilated vs Non-Ventilated Assemblies
| Feature | Ventilated Assembly | Non-Ventilated Assembly |
|---|---|---|
| Energy Savings | Up to 40% cooling cost saved | Lower |
| Condensation Risk | Minimal with proper airflow | High, especially in winter |
| Lifespan | 40–70 years | May be reduced by moisture |
| Maintenance | Low | High if condensation occurs |
Moisture Management Best Practices
Understanding the dew point isn’t just for weather nerds—it’s critical for your roof’s health. You want that dew point to stay outside your roof system, not inside where it can cause damage.
Vapor permeability matters too. In humid climates, use underlayment that blocks water but lets vapor escape. Think of it like a good rain jacket—waterproof on the outside, breathable on the inside.
Keep your attic airflow clear and strong. Those soffit vents aren’t just decoration—they’re the starting point for air circulation that keeps your roof dry and your energy bills low. Install baffles if insulation is blocking the airflow path.
Weight & Expansion Considerations
Here’s some good news: metal roofing is surprisingly light—about 1-1.5 pounds per square foot compared to 3-4 pounds for asphalt shingles. Most homes can easily handle the combined weight of both layers, but it’s still smart to have a structural check if your house is older or you’re concerned about load capacity.
Thermal movement is where metal roofing shows its personality. Metal expands when hot and contracts when cold—sometimes by several inches on a long roof. Smart installers use slotted holes or floating clip systems that let panels move without buckling or popping fasteners.
Finally, remember galvanic isolation—a fancy term for “don’t let different metals touch.” Use the right fasteners and isolators to prevent corrosion where dissimilar metals might meet. It’s a small detail that makes a huge difference in longevity.
Want to dive deeper into the technical side? Check out our Blog for more insights on metal roofing science.
Cost, Benefits, Maintenance & Warranty Insights
How Much Does a Metal Roof Over Shingles Cost?
Let’s talk dollars and sense! When you choose a metal roof over shingles, you get real savings right from the start. By skipping the messy and expensive tear-off, homeowners often save up to 25% on the total project cost. That means more money in your pocket—and less time worrying about dumpsters or landfill fees. Keeping your old shingles in place not only saves hassle, it also keeps tons of waste out of the landfill.
Energy rebates are another big plus. Many metal roofs (like those from DML USA Metal Roofing) can qualify for energy tax credits thanks to their cooling power and eco-friendly designs. And don’t forget about insurance discounts—metal roofs are rated Class 4 for impact/hail and Class A for fire resistance, which can mean lower premiums with many insurance companies.
With a metal roof over shingles, you’ll notice the difference on your utility bills, too. The reflective surface of metal can cut summer cooling costs by up to 40%! Add in the fact that stone-coated panels are warrantied to withstand winds up to 120 mph and hail up to 2.5 inches, and you’ve got real protection from Midwest weather.
Longevity is a huge benefit. While traditional shingles may last only 12–20 years, a metal roof can hold strong for 40–70 years with little fuss. Plus, maintenance is a breeze—no more worrying about curling shingles or missing granules. Just a quick check now and then, and you’re set.
Long-Term Maintenance Checklist
Owning a metal roof over shingles means less work, but a little TLC goes a long way. Each year, take a walk around the house and check for loose fasteners, flashing, or stuck debris. Clear out gutters and valleys to keep water flowing smoothly. If you ever spot a scratch, a dab of touch-up paint will keep rust at bay. For roofs with exposed fasteners, check their tightness every few years—just to make sure nothing wiggles loose over time.
Insurance & Warranty Implications
Peace of mind is part of the package. Many insurers offer discounts for homes with metal roofs—just ask your agent about policies for impact and fire resistance. If you installed a metal roof over shingles as an overlay, be sure to keep your inspection records handy. Some insurance companies may want proof that your deck and base structure were in good shape before covering everything up.
DML USA Metal Roofing stands behind its products with strong, transferable warranties—great news if you ever plan to sell your home. Don’t forget to register your warranty after installation to lock in your coverage.
Curious about all the reasons metal is such a smart upgrade? Check out Why Choose Metal Roofing for more details.
In short: With a metal roof over shingles, you get long-lasting protection, significant savings, and a worry-free roof that’s built for decades. That’s what we call a solid investment!
Frequently Asked Questions about Metal Roof Over Shingles
Let’s tackle the most common questions homeowners ask about metal roof over shingles installations. These are the real concerns I hear every day from folks considering this smart upgrade.
Can I install metal over two layers of shingles?
Short answer: No way. This is one of those hard-and-fast rules you can’t bend.
Most building codes, including the International Building Code that’s widely adopted across the country, set a two-layer maximum for any roof system. If you already have two layers of shingles up there, you’ve hit your limit.
Here’s why this code limit exists: Each layer adds weight, traps moisture, and makes it harder to spot problems underneath. Plus, your local building inspector won’t sign off on it—and trust me, you don’t want to deal with that headache later.
If you’re sitting on two layers already, a full tear-off is mandatory. I know it’s not what you want to hear, but it’s actually a blessing in disguise. You’ll get to inspect and repair the deck properly, which means your new metal roof will last even longer.
Will the added weight affect my trusses?
Usually not, but let’s do the math. This is actually one of the best parts about metal roofing—it’s incredibly lightweight.
Your existing asphalt shingles probably weigh around 3-4 pounds per square foot. Quality metal roofing? Just 1-1.5 pounds per square foot. So even with both layers, you’re likely looking at less total weight than many other roofing materials.
That said, every home is different. Engineer approval might be needed if your house has:
– Older trusses or rafters with previous repairs
– Signs of sagging or structural stress
– Unusual spans or architectural features
– Heavy snow load requirements in your area
The load calculation is straightforward for most homes, but when in doubt, get a structural engineer’s opinion. It’s a small investment that protects a much bigger one.
How does a metal roof over shingles impact energy efficiency?
Get ready for some seriously lower cooling bills. This is where metal roof over shingles installations really shine—literally.
Metal roofing has excellent reflectivity, bouncing sun rays away instead of absorbing them like dark shingles do. But here’s the real magic: that air gap created by your furring strips or spacer system acts like a natural cooling zone.
This Above-Sheathing Ventilation (ASV) setup can cut your cooling costs by up to 40% during hot summer months. The air gap lets heat escape before it reaches your attic, keeping your whole house more comfortable.
Even better? You might qualify for federal tax credits for energy-efficient home improvements. Check with your tax advisor about current incentives—they change periodically, but metal roofing often qualifies because of its energy-saving properties.
One homeowner told me their electric bill dropped so much in the first summer, they wished they’d made the switch years earlier. That’s the kind of feedback that makes this work worthwhile.
Conclusion
Choosing a metal roof over shingles is more than just a smart upgrade—it’s an investment in your home’s future. You’ll save on installation costs, skip the mess and landfill waste of tearing off old shingles, and enjoy the peace of mind that comes with a roof built to last for decades. Plus, you get the bonus of lower energy bills, a cooler attic in summer, and almost no maintenance chores. That’s a win-win-win!
Of course, every great result starts with careful planning. Make sure your existing roof is in solid shape, follow building codes, and don’t be afraid to ask for expert help when you need it. A professionally installed metal roof over shingles isn’t just about good looks—it’s about safety, longevity, and protecting what matters most.
At DML USA Metal Roofing, we’re proud to manufacture high-quality panels right here in Illinois. Our products are made to stand up to Midwest wind, hail, and sun, and they come with energy-saving benefits, strong warranties, and the kind of durability you can count on. If you’re ready to take the next step or just want honest answers, contact us for a free, no-pressure consultation. Let’s make your roof the strongest part of your home.
Want to dive deeper? You’ll find more how-tos, expert tips, and our full lineup of products on the DML USA Metal Roofing website. We’re here to help you roof smarter, save more, and rest easier—today and for years to come.
