Metal roof valley installation: 4 Pro Steps
Why Proper Metal Roof Valley Installation is Critical for Your Home
Metal roof valley installation is one of the most critical aspects of any metal roofing project, yet it’s where most leaks occur if done incorrectly. Here’s what you need to know:
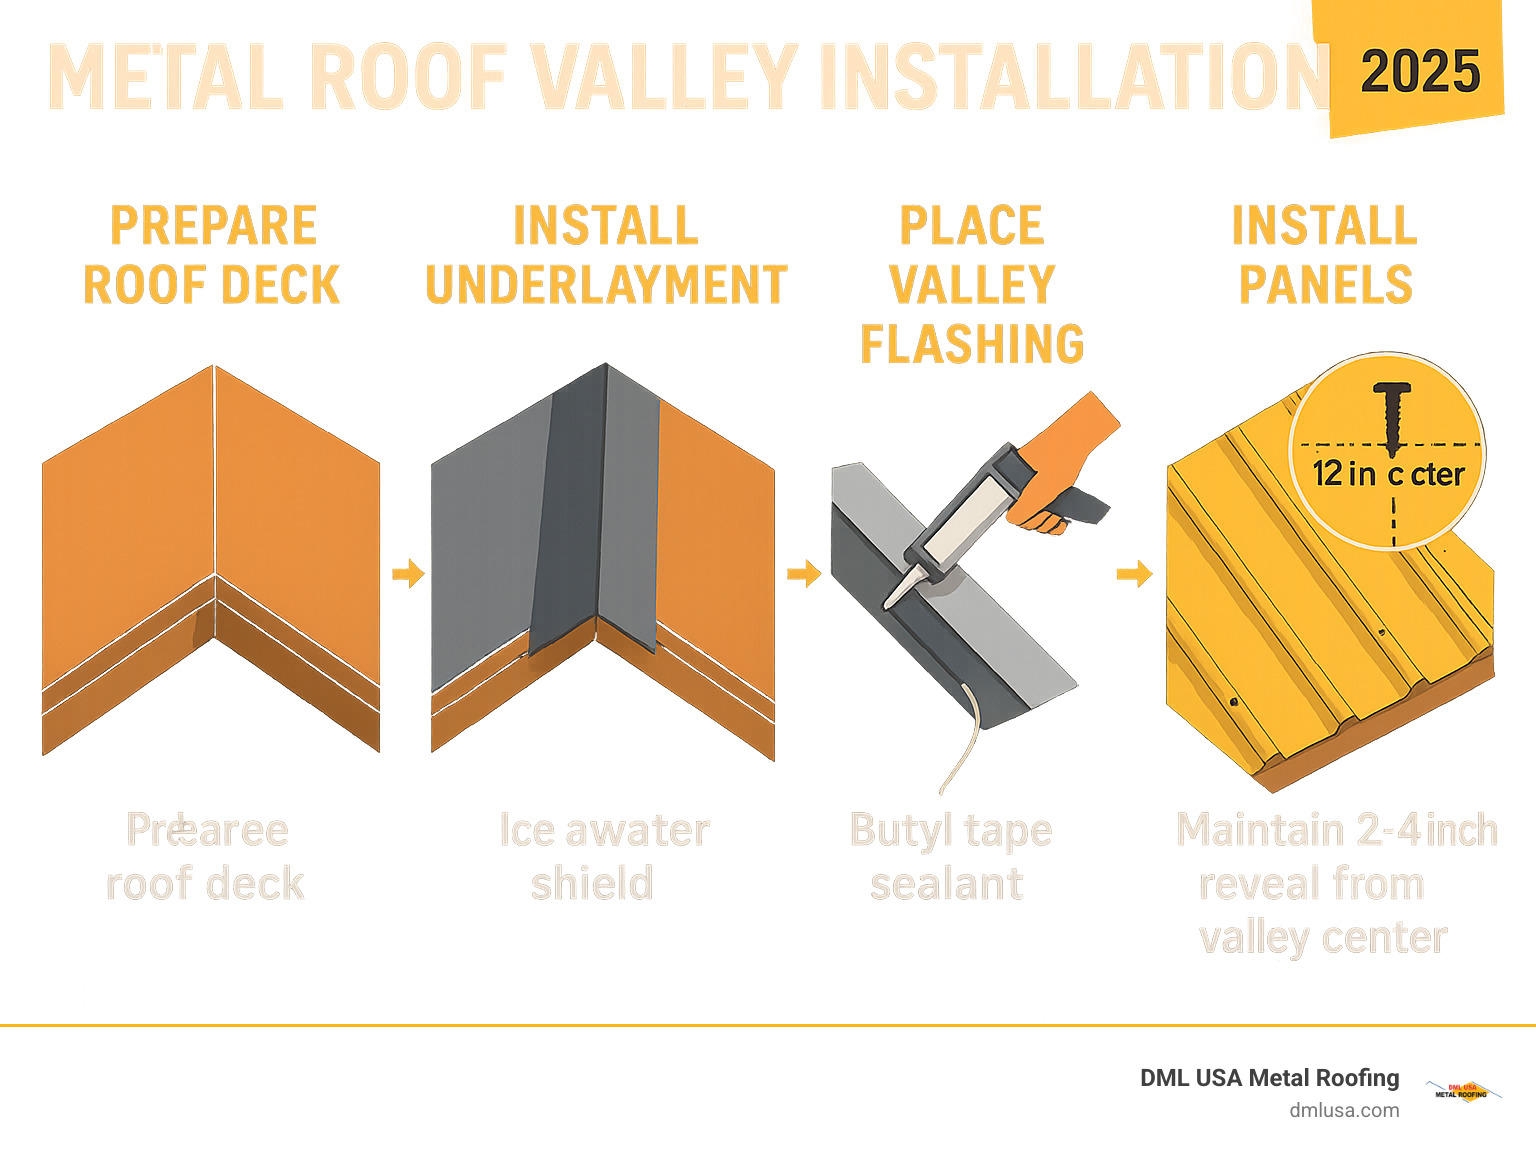
Essential Steps for Metal Roof Valley Installation:
- Prepare the roof deck – Clean, flat surface with proper underlayment
- Install ice and water shield – Center in valley for maximum protection
- Cut and fit valley flashing – Allow 1-inch overhang at eave, proper hem at ridge
- Fasten with sealant – Use butyl tape and pancake head screws 12 inches on center
- Overlap sections – Minimum 6-inch overlap with continuous sealant
- Install panels – Maintain 2-4 inch reveal from valley center
A roof valley is the angled channel where two roof slopes meet. It’s designed to collect and direct water runoff away from your home. However, valleys are also the second most likely spot on a roof to develop leaks – making proper installation absolutely essential.
The stakes are high because valleys handle the heaviest water flow on your entire roof. When two roof planes meet, all that water concentrates into this single channel. Poor installation here can lead to expensive water damage, rotted decking, and costly repairs down the road.
Why valleys are leak-prone:
- Heavy water concentration from multiple roof planes
- Complex intersection requiring precise flashing work
- Debris accumulation can cause water dams
- Thermal expansion and contraction stress
I’m Adam Kadziola, and with over 15 years of experience in metal roofing manufacturing and installation, I’ve seen how proper metal roof valley installation can make or break a roofing system’s performance. At DML USA Metal Roofing, we’ve helped thousands of homeowners achieve leak-free valleys that last decades.
Understanding Your Valley: Types, Tools, and Materials
Before you ever pick up a hammer, know exactly what you\u2019re installing and have every supply on-site. Most leaks we repair start with rushed prep.
For deeper dives, visit more info about our roofing resources.
Open vs. Closed Valleys: What\u2019s Best for Metal Roofs?
For metal roofing, open valleys are the clear winner. By leaving a visible metal channel\u2014usually 4-8 in. wide\u2014you create the fastest, cleanest path for water, snow, and debris. A closed valley hides the flashing and relies on hidden sealants that fail long before the metal does.
We recommend W-profile flashing for its raised center rib, which keeps water from hopping across the valley. V-profile works but has less splash protection.
| Feature | Open Valley | Closed Valley |
|---|---|---|
| Water Shedding | Excellent | Moderate |
| Debris Flow | Excellent | Poor |
| Durability | 50+ yr metal | Dependent on sealant |
| Maintenance | Easy visual check | Difficult |
| Leak Risk | Low | Higher |
| Aesthetics | Defined lines | Seamless look |
| Long-Term Cost | Lower | Higher repairs |
After 500+ open-valley installs, we\u2019ve never seen one leak when these basics are followed.
Gathering Your Tools and Materials
Nothing stalls a project faster than missing gear on the roof. Have these ready:
Essential tools
- Safety glasses & gloves (metal edges are sharp)
- 25 ft tape measure
- Metal snips or nibbler (never an abrasive saw)
- Chalk line
- Drill/driver with magnetic bit
- Caulking gun
Key materials
- W-profile metal valley flashing
- High-temperature ice & water shield (\u2265 2 ft wide)
- Synthetic underlayment
- Butyl tape sealant
- #10 \u00d7 1\\” pancake-head screws with EPDM washers
- Expanding foam closure strips
Budget roughly $150\u2013$400 in materials for a typical home, with valley trim itself running $3\u2013$6 per linear foot depending on gauge and finish.
Pro storage tip: keep factory film out of direct sun and cover bundles with a breathable tarp. Heat fuses plastic to the panel and ruins the finish.
The Step-by-Step Metal Roof Valley Installation Guide
Follow each layer in order—deck, membrane, flashing, panels—and water will shed exactly where you want for decades.
Step 1: Prepare the Roof Deck and Underlayment
- Inspect decking; replace any rotten or warped boards.
- Sweep away debris and pull old fasteners.
- Center ice & water shield in the valley, extending at least 24 in. up each roof plane. Press out bubbles; you get one chance.
- Lap synthetic underlayment 3 in. over the ice & water shield. Cut the upper corner so water naturally turns into the valley.
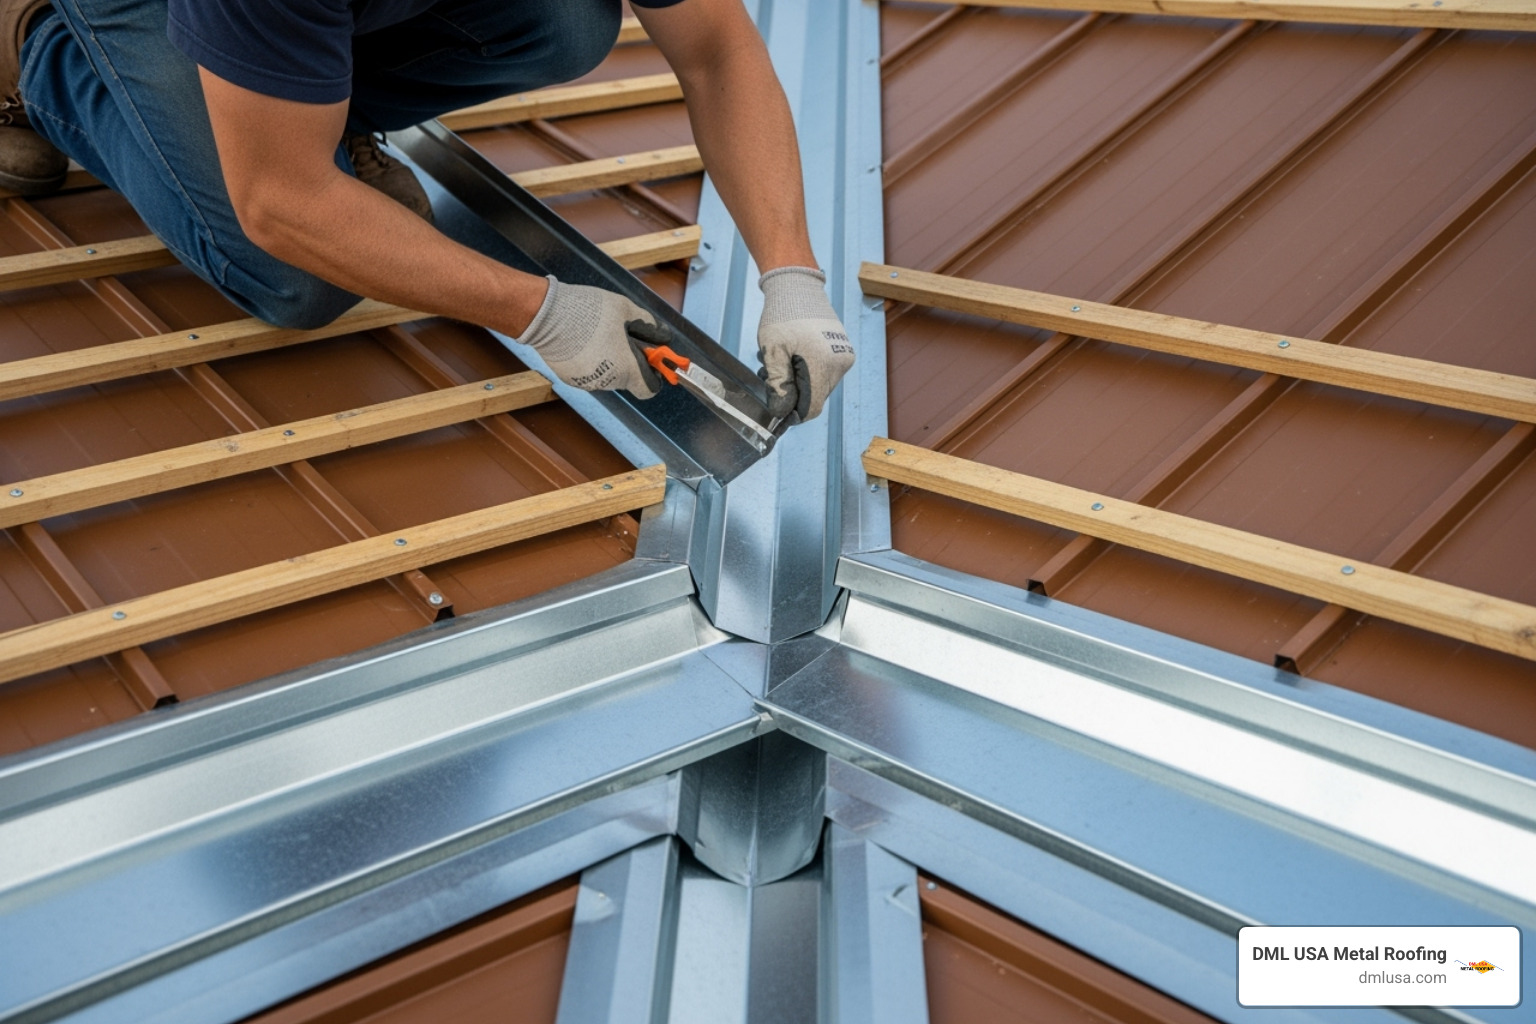
Step 2: Cut and Fit the Valley Flashing
- Start at the eave, measure a 1-in. overhang.
- Mark, cut, and hem the eave end; fold flaps for a clean drip edge.
- At the ridge, trace the roof peak, cut along your marks, and fold to suit pitch.
- Always cut with sharp snips or a nibbler—never heat-generating grinders.
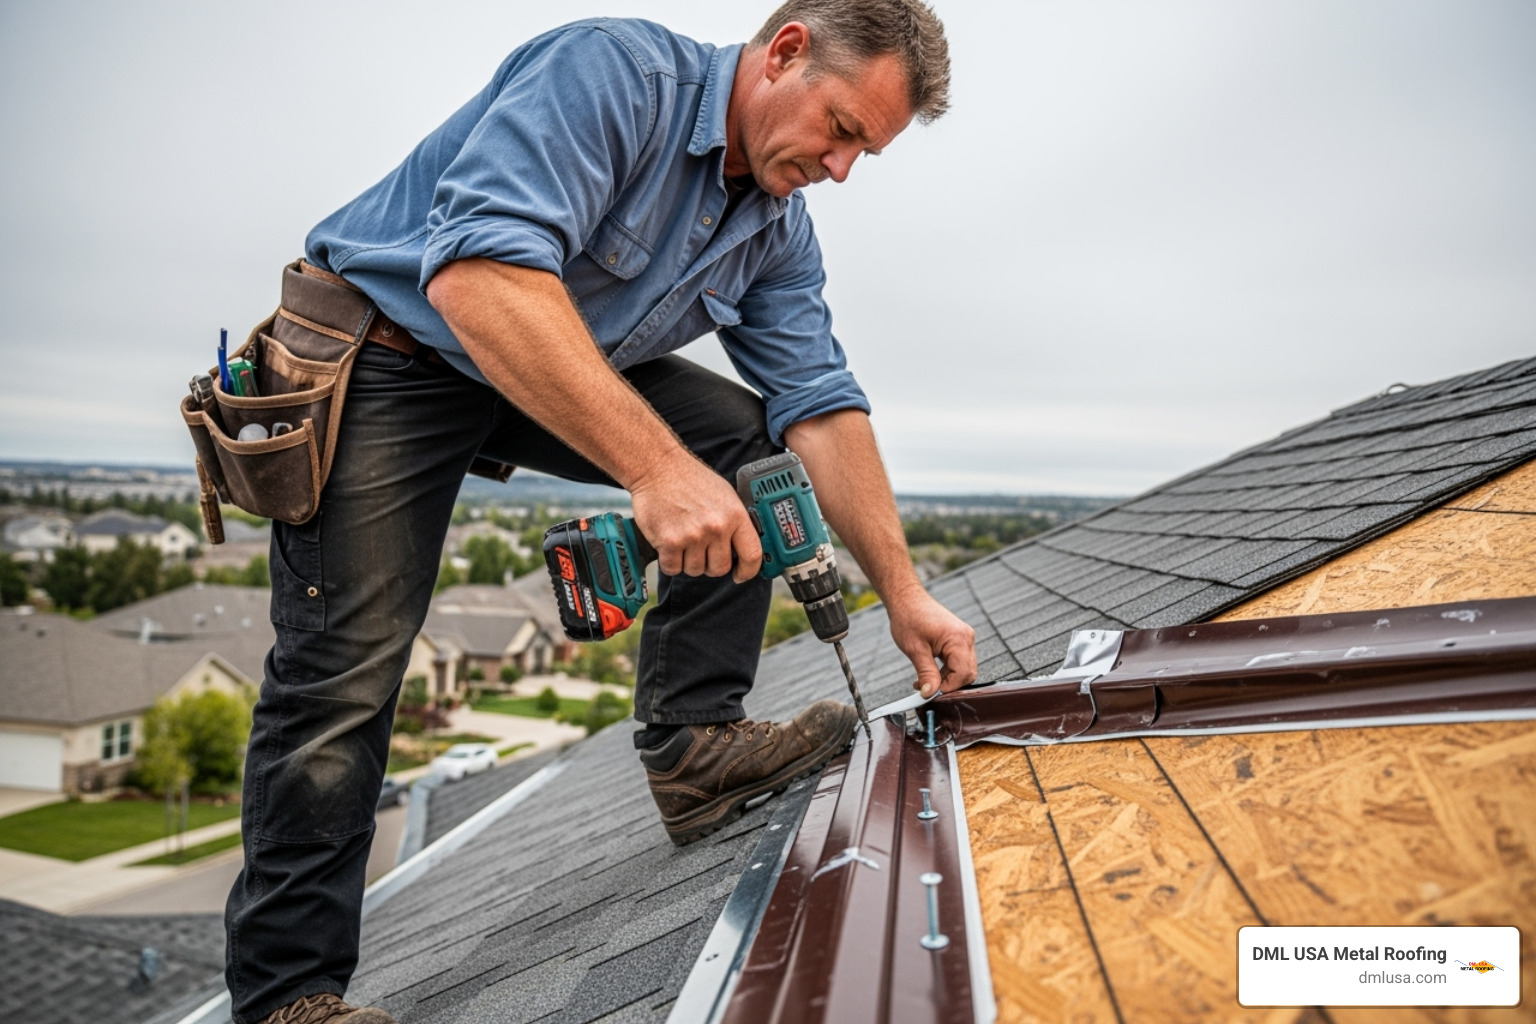
Step 3: Fasten and Seal the Valley Flashing
- Run a continuous bead of butyl tape 1 in. from the flashing edge.
- Center flashing, remove film, lay flat.
- Fasten edges with #10 pancake screws every 12 in., staying out of the water channel.
- Overlap successive pieces a minimum of 6 in.; seal the overlap with more butyl before fastening.
Step 4: Install Panels Along the Valley
- Snap chalk lines 2-4 in. from valley center on each side.
- Calculate panel cuts: create a right-triangle template, add 1 in. for a hem, and cut panels upside down so swarf falls on the back.
- Place foam closure strips along the flashing edge.
- Fasten panels into the deck—not through the valley—using manufacturer spacing. Check alignment every three rows.
For whole-roof performance benefits, see Why Choose Metal Roofing.
Ensuring a Watertight Seal: Best Practices and Common Mistakes
A metal valley succeeds because every layer “shingles” over the one beneath it. Follow these pro habits and you’ll sleep dry for decades.
Pro Tips for a Durable Installation
- Think like water. Maintain continuous downhill paths—no reverse pitches, bumps, or gaps.
- Respect the shingle principle. Upper pieces always overlap lower pieces, from underlayment to panels.
- Clean metal shavings (swarf) immediately. Rust stains void warranties.
- Verify panel alignment every few rows; small errors multiply fast.
- Use sealant as insurance, not structure. Mechanical fasteners and correct laps do the real work.
How to Avoid Common Valley Problems
Problem | Why It Happens | Prevention
——- | ————– | —-Leakage | Wrong lap sequence, fasteners in valley center | Follow the step order; keep screws at edges
Improper Flashing | Valley too narrow or fasteners too close | Use correct width W-profile; 1-in. edge fastener rule
Mixed Metals | Galvanic corrosion | Keep materials compatible (steel with steel, aluminum with aluminum)
Sagging | Under-sized fasteners or wide spacing | Use #10 screws at 12-in. o.c.
Debris & Ice Dams | Valley too tight or poor slope | Maintain 2-4 in. reveal; ensure proper pitch
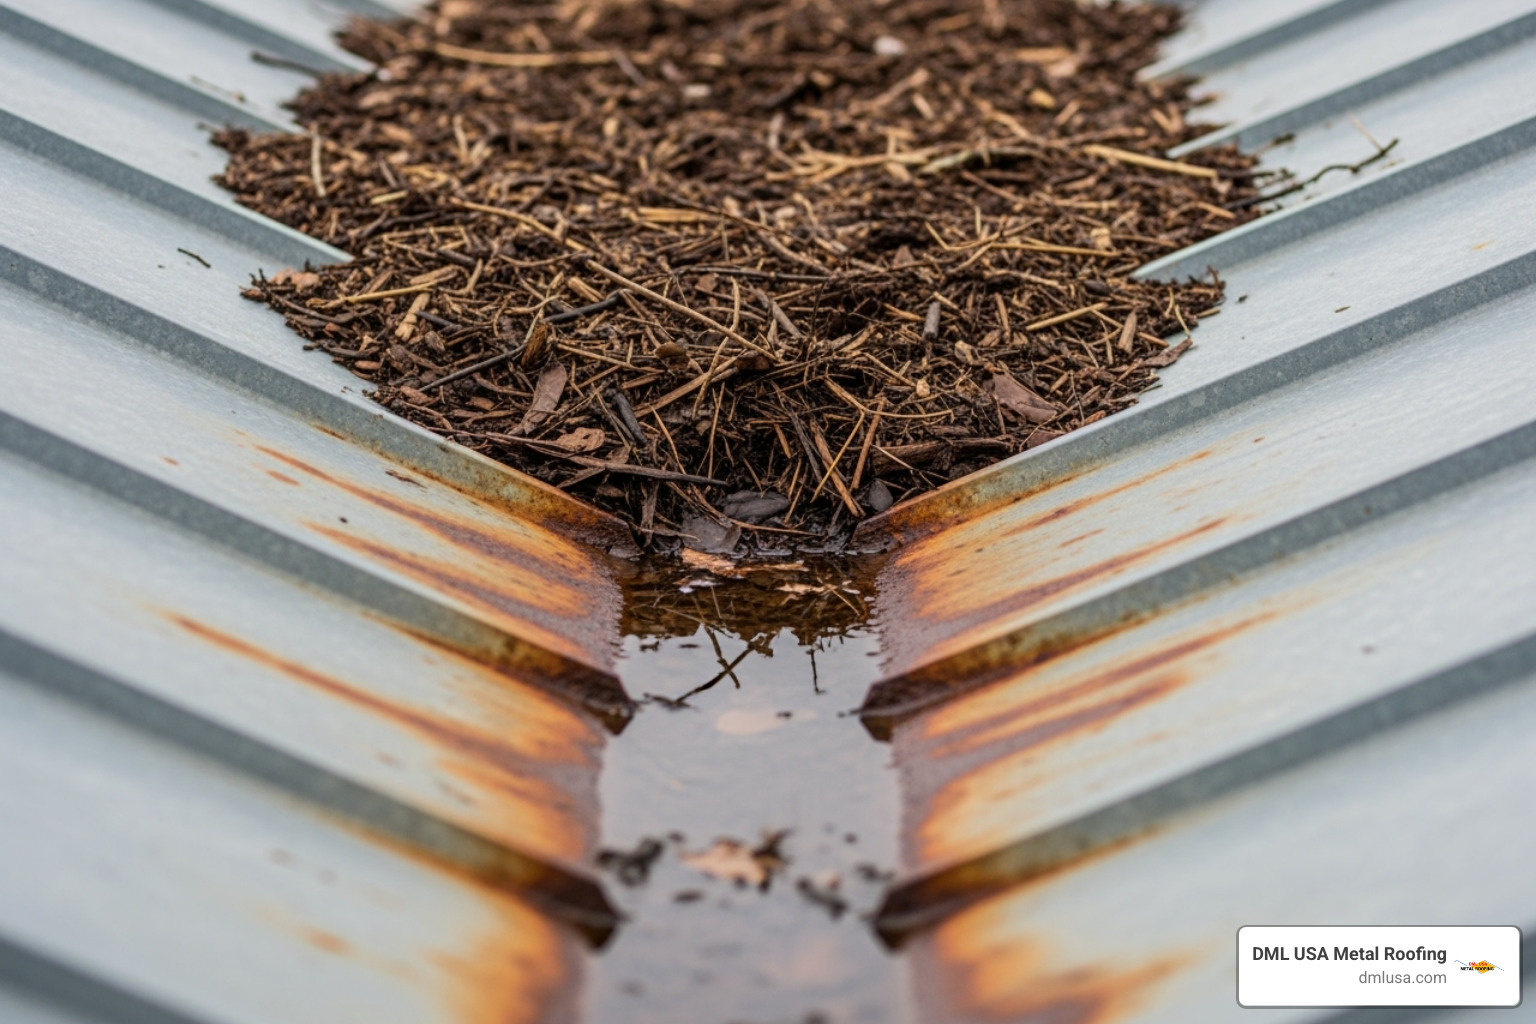
Regular visual checks and quick clean-ups beat expensive repairs every time.
Frequently Asked Questions about Metal Roof Valley Installation
When it comes to metal roof valley installation, we get asked the same questions over and over again. These are the concerns that keep homeowners up at night – and honestly, they should! Getting these details right makes the difference between a valley that protects your home for decades and one that causes expensive headaches.
Let me share the answers based on our 15+ years of experience helping homeowners achieve leak-free valleys.
How much should metal roof valley panels overlap?
Here’s the golden rule: a minimum of 6 inches is recommended for overlapping valley flashing sections to ensure water cannot get underneath the upper piece. This isn’t just a suggestion – it’s based on industry standards and our experience with thousands of installations where we’ve seen what works and what doesn’t.
But here’s where it gets interesting – that 6-inch minimum might not be enough in every situation. Low-slope roofs (less than 4:12 pitch) should use an 8-inch minimum overlap because water moves more slowly and has more time to find its way under seams. High-wind areas may require additional overlap for uplift resistance, and heavy snow regions benefit from larger overlaps to handle ice dam conditions.
The real secret sauce? Always apply a continuous bead of butyl sealant at the overlap before fastening. This creates a secondary seal that prevents water infiltration even if the mechanical overlap somehow fails. Apply the sealant 1 inch from the bottom edge of the overlap – this creates a watertight barrier without interfering with the natural thermal movement of the metal.
Think of it this way: the overlap is your primary defense, and the sealant is your backup. Both working together create a system that’s virtually bulletproof.
Should I use an open or closed valley for my metal roof?
This question comes up constantly, and I’m going to give you the straight answer: an open valley is highly recommended for metal roofing systems. Period. Here’s why this choice is so crucial for your project’s success.
Open valleys are superior because they work with metal’s natural strengths rather than against them. The exposed metal channel allows faster water evacuation – water flows at maximum speed down that smooth metal surface. Better debris management means leaves and twigs slide right down instead of getting trapped. Easier maintenance lets you inspect and clean the valley without guessing what’s happening under hidden materials.
Most importantly, open valleys have reduced leak risk because they don’t depend on hidden sealants for primary waterproofing. The longer lifespan of metal valleys – typically 2-3 times longer than other materials – makes this a no-brainer investment.
The exposed metal channel is simply more effective at shedding water, snow, and debris quickly, reducing the risk of leaks and water dams compared to a closed valley system.
Closed valleys are problematic for metal roofs because they fight against metal’s natural advantages. They can trap water and debris, rely heavily on sealants for waterproofing, and are difficult to inspect and maintain. Most frustrating of all, they don’t take advantage of metal’s superior water-shedding properties.
Based on our experience with hundreds of installations, open valleys with W-profile flashing provide the best long-term performance for metal roofing systems. We’ve literally never had a leak with a properly installed open valley system.
Can I install a metal roof valley over existing shingles?
I’m going to be honest with you here – while some installations are done over shingles, it is best practice to remove the old shingles, especially in the valley area. This provides a clean, flat, and solid deck for the new underlayment and metal flashing, ensuring a more secure and leak-proof installation.
Here’s why installing over existing shingles creates problems: Uneven surfaces from shingles cause valley flashing to buckle and create stress points. Moisture problems develop when moisture gets trapped between layers, leading to rot and corrosion you can’t see until it’s too late. Fastening issues occur because fasteners may not achieve proper holding power through multiple layers. Thermal movement differences between materials can cause stress and eventual failure.
When removal is absolutely essential: Valley areas should always be stripped to the deck – no exceptions. Areas with damaged or curled shingles need to go. Roofs with multiple layers of existing shingles are asking for trouble. Any area where moisture damage is suspected should be completely exposed for inspection.
If you absolutely must install over shingles (and I really don’t recommend it), you need to strip the valley area completely and add lumber for a flat surface. Use longer fasteners to reach the structural deck, install additional underlayment for moisture protection, and seriously consider professional consultation for complex situations.
For the best long-term performance and warranty coverage, we recommend complete shingle removal, especially in critical areas like valleys. Trust me – the extra work upfront saves you massive headaches later.

Conclusion: The Long-Term Value of a Job Well Done
Proper metal roof valley installation is an investment in your home’s long-term protection and value. By following the precise steps we’ve outlined – from preparing a clean roof deck to fastening panels with proper reveal – you’re creating a system that will protect your home for decades.
Key steps to remember:
- Preparation is everything – Clean deck, proper underlayment, and ice and water shield
- Quality materials matter – Use compatible components designed for metal roofing
- Precision in cutting and fitting – Measure twice, cut once, and maintain consistent reveals
- Proper fastening and sealing – Mechanical fastening with sealant backup, never sealant alone
- Attention to detail – Clean up metal shavings, check alignment, and inspect your work
The importance of precision cannot be overstated. While valley installation requires patience and attention to detail, the long-term benefits make it worthwhile:
Durability Benefits:
- Metal valleys can last 50+ years with proper installation
- Superior resistance to weather, impact, and fire
- Minimal maintenance requirements over the roof’s lifetime
Leak Protection:
- Properly installed open valleys shed water faster than any other system
- Multiple layers of protection prevent water infiltration
- Reduced risk of ice dams and debris accumulation
Increased Home Value:
- Professional-quality installation improves curb appeal
- Energy-efficient metal roofing qualifies for tax credits
- Long-term durability appeals to potential buyers
- Reduced insurance premiums in many areas
At DML USA Metal Roofing, we’re committed to providing high-quality, affordable materials that make professional results achievable for DIY enthusiasts. Our products are manufactured in Illinois with the durability and precision that your project deserves.
Whether you’re tackling your first metal roof valley or you’re an experienced DIYer, having the right materials and knowledge makes all the difference. We’ve seen how proper installation techniques and quality materials create roofing systems that protect homes for generations.
For high-quality, durable materials made for the DIY enthusiast and professional alike, DML USA Metal Roofing provides everything you need for a successful project. From W-profile valley flashing to compatible fasteners and sealants, we have the complete system you need.
Ready to get started on your valley installation project? Explore our full range of metal roofing products and find why thousands of homeowners trust DML USA Metal Roofing for their most critical roofing needs.
A properly installed metal roof valley isn’t just about preventing leaks – it’s about creating a roofing system that adds value, beauty, and protection to your home for decades to come. Take your time, follow the steps we’ve outlined, and enjoy the satisfaction of a job well done.