When Wind Meets Roof: Understanding Your Home’s First Line of Defense
Quick Answer: Roof Wind Resistance
| Wind Speed | Typical Roof Type | Wind Rating |
|————|——————-|————-|
| 60-80 mph | Standard asphalt shingles | Class D |
| 90-110 mph | Impact-resistant shingles | Class F |
| 110-130 mph | Metal roofing (standard) | Class G |
| 140-160 mph | Metal roofing (premium) | Class H |
When those storm clouds gather and winds start howling around your home, there’s something comforting about knowing your roof can handle whatever Mother Nature throws at it. But what exactly makes a roof stand up to fierce winds?
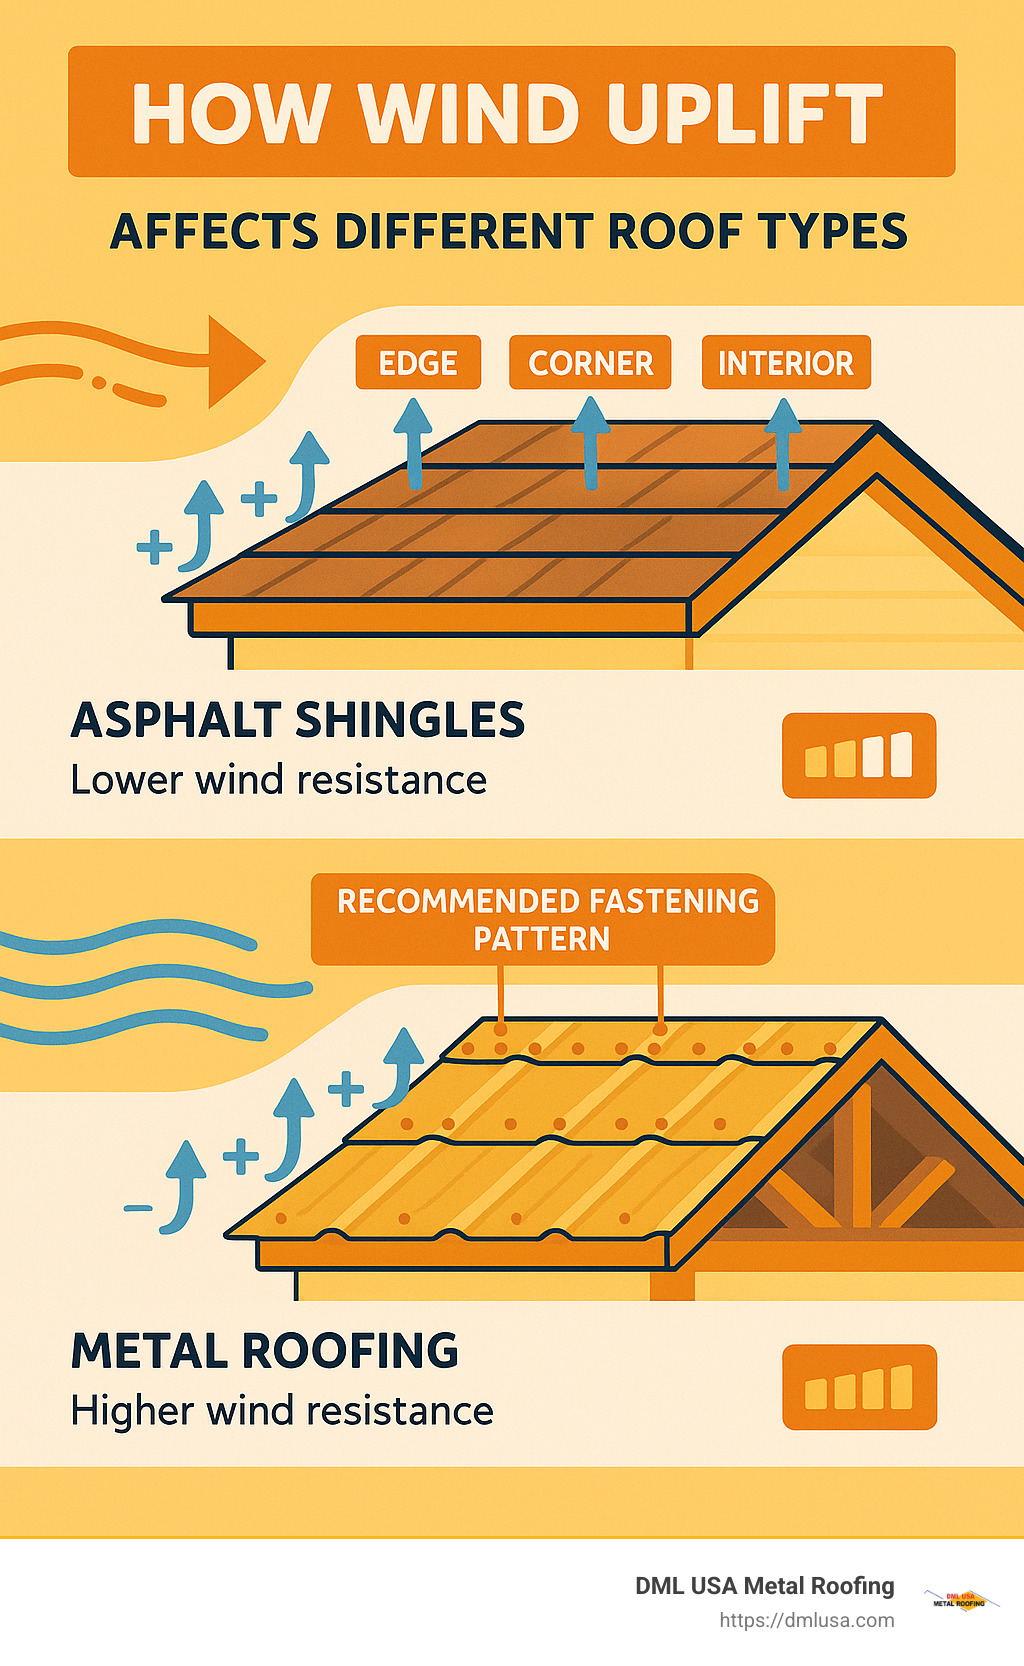
Roof wind resistance is simply your home’s ability to withstand powerful gusts without damage. Think of it as your house’s invisible shield against nature’s fury. When strong winds blow across your roof, they create what engineers call a pressure differential – negative pressure pulling up from above while positive pressure pushes from inside your home. This combination essentially tries to lift your roof like a airplane wing, an effect called wind uplift that’s responsible for most roof failures during storms.
I’ve walked through too many neighborhoods after major storms and seen the heartbreaking difference between homes with proper wind-resistant roofing and those without. The contrast can be stark – one home stands virtually untouched while the neighbor’s house suffers catastrophic damage.
Your roof’s strength against wind depends on four crucial factors:
First, your roofing material makes an enormous difference. Premium metal roofing typically withstands winds up to 140-160 mph, while those standard asphalt shingles might start failing at just 60-80 mph – that’s the difference between surviving a Category 4 hurricane versus struggling in a strong thunderstorm.
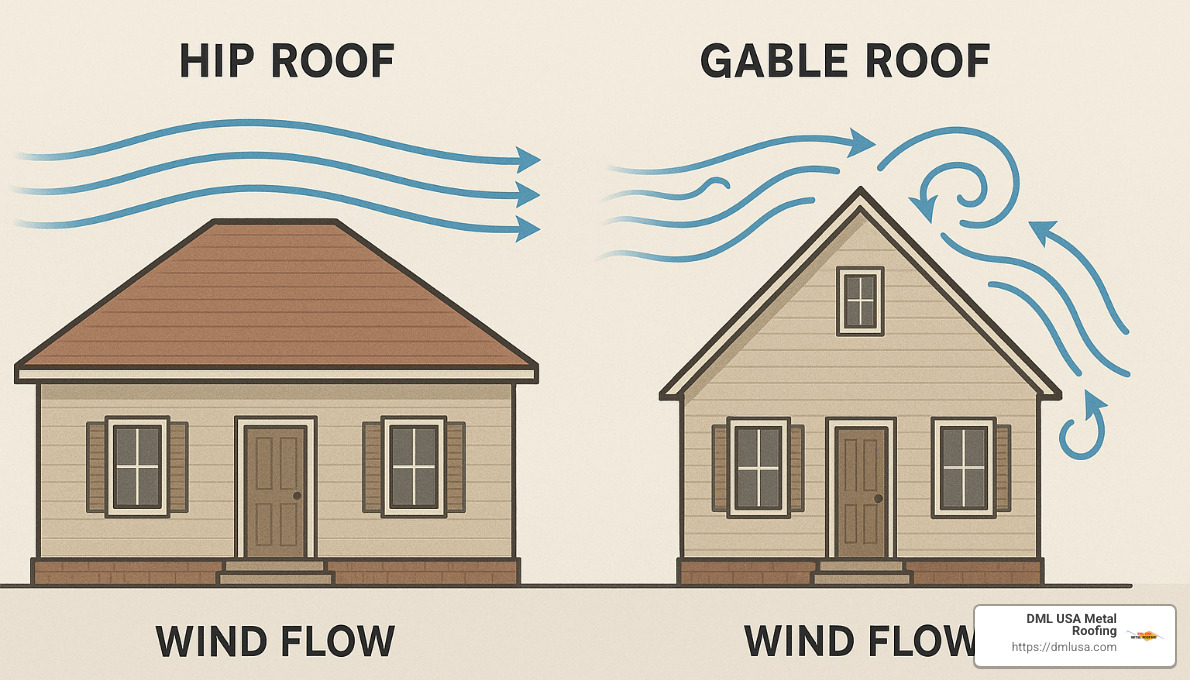
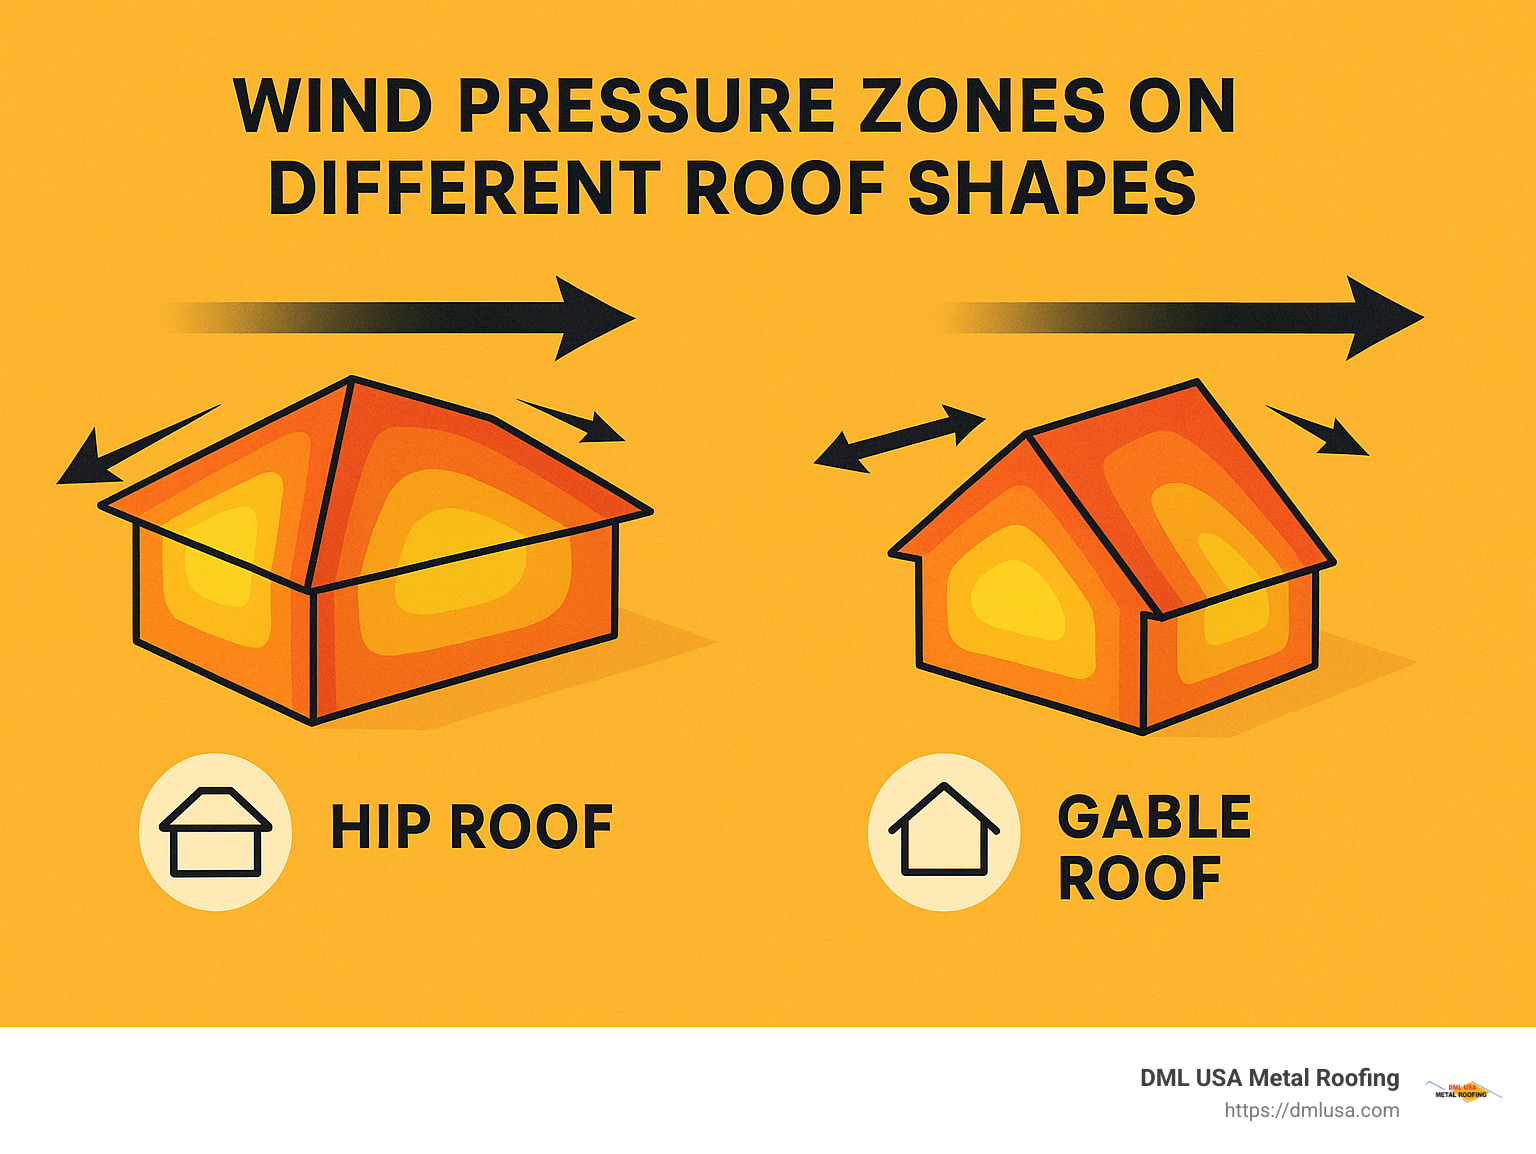
The roof design itself plays a surprisingly important role too. Hip roofs with slopes around 30° can reduce wind uplift by half compared to gable roofs, simply because of how air flows around them.
Never underestimate installation quality. Even the best materials fail when improperly installed. Proper nailing patterns and techniques can improve wind resistance by 20-30% – which is why professional installation is worth every penny.
Finally, age and maintenance matter tremendously. Well-maintained roofs perform about 20% better against wind damage than neglected ones. Those regular inspections and minor repairs pay off when storms strike.
For homeowners in coastal areas or the Midwest’s “Tornado Alley,” selecting materials with proper wind ratings isn’t just about preventing cosmetic damage—it’s about protecting your entire home and investment from devastating losses.
I’m Adam Kadziola, and after spending over 15 years in the metal roofing industry, I’ve witnessed how proper roof wind resistance makes the difference between minor repairs and catastrophic home damage when severe weather strikes.
Easy roof wind resistance glossary:
– hurricane proof roofs
– wind proof roofing
Understanding Roof Wind Resistance
When we talk about roof wind resistance, we’re really talking about your home’s shield against nature’s fury. It’s fascinating—and a bit scary—how wind interacts with your roof in ways that aren’t always obvious until it’s too late.
Wind doesn’t just push against your home like you might imagine. Instead, it creates a complex dance of pressure around your roof. As wind flows over the top, it creates a suction effect (think of an airplane wing), pulling upward with negative pressure. At the same time, if wind sneaks into your home through open windows or gaps, it pushes up from inside with positive pressure. Together, these forces create what we call “wind uplift.”
“Wind uplift is the net upward force on a roofing system caused by wind flowing over and under the roof,” as the Institute for Business & Home Safety puts it. “This force can peel membranes, separate roofing materials, and in extreme cases, lift the entire roof structure.”
Here’s something that surprises many homeowners: uplift force is measured in pounds per square foot (psf), not miles per hour (mph). When you see ratings like FM 1-60 or 1-90 on roofing materials, they’re talking about pressure resistance, not direct wind speed. And the relationship between wind speed and pressure packs a punch—double the wind speed and you quadruple the pressure! That’s why moving up just one wind rating class can make a world of difference during a storm.
Your roof’s battle against wind depends on several factors:
– The terrain around your home (an open field offers no protection)
– How tall your building is (higher means stronger winds)
– Your roof’s shape (complex designs create more turbulence)
– Where you live (coastal areas face higher wind speeds)
Building codes rely on wind zone maps from the American Society of Civil Engineers’ ASCE 7 standard to determine what’s required in different regions. If you’re in a coastal hurricane zone, your roof might need to withstand winds of 140+ mph—that’s no small task!
Scientific research on wind uplift confirms that this phenomenon can do significant damage to roofing systems, particularly when materials aren’t properly secured or rated for the expected wind conditions in your area.
How “Roof Wind Resistance” Is Measured
The roofing industry doesn’t just guess at how well materials will hold up in a storm—there’s serious science behind roof wind resistance ratings. These standardized tests help you cut through marketing claims and understand what your roof can truly handle.
UL 1897 is like the weightlifting competition for roofs. Testers apply increasing pressure to a roof sample in 15 psf increments, holding each level for one minute. The final pressure it withstands becomes its rating. It’s a bit like seeing how much weight your roof can bench press before giving out!
UL 580 takes a more holistic approach, testing the entire roof assembly—decking, insulation, membrane, and fasteners—and classifying it as Class 15, 30, 60, or 90. This matters because your roof is only as strong as its weakest link.
If you live in hurricane territory, look for TAS 125 testing. This Miami-Dade County protocol for High-Velocity Hurricane Zones is among the toughest standards out there—like the Navy SEAL training of roof testing.
For shingle roofs, two ASTM standards come into play:
– ASTM D3161 uses giant fans to simulate wind at 60 mph (Class A), 90 mph (Class D), or 110 mph (Class F)
– ASTM D7158 tests mechanical uplift resistance with classes ranging from D (90 mph) to H (150 mph)
“Most asphalt shingles have a thermally activated asphaltic sealant that bonds them together once they’re heated by sunlight,” notes the Asphalt Roofing Manufacturers’ Association. This thermal sealing is critical—without it, shingles can lift and tear away even in moderate winds.
Roof Wind Resistance vs. Roof Wind Uplift: What’s the Difference?
Though often confused, roof wind resistance and roof wind uplift are actually different concepts, and understanding the distinction can help you make better roofing decisions.
Roof wind resistance is the comprehensive package—your roof’s overall ability to stand firm against everything wind throws at it. This includes direct wind pressure, wind-driven rain finding its way into tiny gaps, debris impacts during storms, and the long-term fatigue from years of wind events. It’s the complete picture of your roof’s wind-fighting capabilities.
Wind uplift, on the other hand, zooms in specifically on those upward forces created by pressure differentials. One roofing expert explained it perfectly: “Think of your roof as an umbrella that protects the home below. Wind resistance is how well the umbrella stands up to a storm, while wind uplift is specifically about whether the umbrella turns inside out.”
There’s also good news hidden in the ratings: safety factors. Most roofing standards build in a safety factor—typically 1.5 to 2.0—when assigning ratings. So a roof rated for 90 psf should actually withstand pressures of 135-180 psf before failing. This built-in buffer accounts for normal aging, slight installation variations, and those unexpected wind gusts that exceed predictions.
ASTM D6630 makes this explicit: “Wind uplift forces should be determined according to ASCE-7. Roof system wind uplift resistance shall have a minimum 2.0 factor of safety.”
At DML USA Metal Roofing, we design our products with these safety factors in mind. Our metal roofing systems don’t just meet minimum standards—they’re engineered to deliver real-world performance that gives you peace of mind when the forecast turns ominous.
How Wind Damages Roofs & Smart Prevention
When Mother Nature flexes her muscles, your roof is often the first line of defense. But wind doesn’t simply blow a roof off in one dramatic swoop—it’s more like a strategic opponent, looking for weaknesses and exploiting them one by one.
Wind uplift is your roof’s biggest enemy. As wind rushes over your home, it creates a vacuum effect—literally sucking upward on your roofing materials. Think of holding your hand out a car window at 70 mph; now imagine that force pulling on every square inch of your roof. This invisible force works against fasteners, adhesives, and even the weight of the materials themselves, with corners, edges, and ridges taking the brunt of the attack.
When rain joins the party, things get messier. Once winds exceed 35 mph, rain no longer falls straight down—it drives sideways, finding its way under shingles and around flashing. This wind-driven rain is sneaky, causing damage that might not show up until months later as stains on your ceiling or mold in your attic.
“A roof that passes TAS-100 testing can stand up to 8 inches of wind-driven rain at speeds from 35-110 mph for a full 90 minutes without leaking,” explains Adam Kadziola, our metal roofing expert. “That’s the difference between a dry attic and a very bad day.”
Then there’s the flying debris—branches, lawn furniture, or parts of other structures that become dangerous projectiles. These debris impacts can puncture or dislodge roofing materials, creating entry points for both wind and water.
Once wind manages to lift the edge of your roofing material, even slightly, the game changes. That small opening allows wind underneath, increasing uplift forces and often leading to a “peeling” effect that can strip large sections of roofing in seconds.
Smart prevention starts with thoughtful design. A roof pitched at about 30 degrees can reduce wind uplift by half compared to flatter roofs. Wind flows more smoothly over steeper slopes, much like water over a rock, creating less turbulence and pressure.
Hip roofs significantly outperform gable roofs in high winds. Without those large, flat end walls that catch wind like sails, hip roofs present a more aerodynamic profile to oncoming storms. It’s the difference between holding a flat board or a wedge against the wind.
Proper attic ventilation plays a surprising role too. Balanced ventilation helps equalize pressure inside and outside your home, reducing the likelihood of roof deck failure. Just make sure those vents are designed to keep water out while letting air flow.
Other smart protective measures include properly secured gutters that won’t become wind catches, quality sealants at critical junctions, wind-rated flashing around roof penetrations, and secondary water barriers beneath your primary roofing materials.
Wind Damage Hot-Spots on a Typical Roof
Not all parts of your roof face equal risk during high winds. Knowing the vulnerable spots helps you focus your protection efforts where they matter most.
The eaves—those lower edges that overhang your walls—are particularly susceptible to wind damage. Wind can easily get underneath this overhang and push upward with surprising force. For homes with asphalt shingles, manufacturers often recommend special adhesive starter strips to secure these vulnerable edges.
The rakes (those sloped edges on gable ends) face similar challenges. These edges catch wind like the edge of a sail and experience strong uplift forces. Metal drip edge flashing, when properly secured, can make a world of difference in protecting these areas.
Flashing around chimneys, vents, and skylights creates natural weak points in your roof’s armor. These transitions between different materials can separate during wind events if not properly sealed and secured. In high-wind regions, we recommend extra fasteners and high-quality sealant around all penetrations.
The fasteners themselves can become failure points over time. Wind creates a fluttering effect that gradually works nails or screws loose—like repeatedly bending a paper clip until it breaks. Once a fastener backs out even slightly, it creates an entry point for wind to exploit.
“I can’t stress enough how important proper nail placement is,” says one of our installation experts. “Nails driven at an angle or overdriven can puncture the shingle, while underdriven nails won’t provide secure holding power. It needs to be just right—straight and flush with the surface.”
The roof sheathing (those wooden panels forming the foundation for your roofing materials) must be properly secured to the structure beneath. Inadequate fastening here can lead to catastrophic failure where entire sections of roof deck take flight.
According to the National Weather Service, wind speeds of just 45 mph—not even official storm strength—can cause structural roof damage if these vulnerable areas aren’t properly reinforced.
Design Details that Cut Damage in Half
Some design choices can dramatically improve your roof’s wind resistance, potentially cutting your damage risk by 50% or more during severe weather.
A 30° slope creates an aerodynamic profile that allows wind to flow more smoothly over your roof surface. Research shows this simple design choice can reduce uplift forces by up to half compared to lower-slope roofs. It’s like the difference between holding a flat board or an angled board against the wind.
Closed valleys (where two roof slopes meet) provide better protection than open valleys. With closed valleys, roofing material extends across the junction, leaving no exposed flashing that could catch wind or allow water entry. Think of it as the difference between a sealed seam versus an open one on your raincoat.
Continuous clips for metal roofing distribute wind loads across larger areas rather than concentrating stress at individual fastener points. These clever devices allow for thermal expansion and contraction while maintaining wind resistance.
“Standing seam metal roofing flexes under wind rather than tearing off,” explains Adam. “This flexibility, combined with proper clips, is why metal roofing consistently outperforms other materials in high winds.”
Hurricane straps create a continuous chain of strength from your roof framing down to your foundation. While invisible once construction is complete, these small metal connectors create a complete load path that helps your entire house work together against wind forces. It’s the difference between individual components fighting the wind separately versus your home responding as a unified structure.
Other effective design details include tapered edges on parapet walls to reduce turbulence, wind baffles in soffit vents to prevent rain entry, staggered seams in roofing panels, and reinforced perimeters with additional fasteners or adhesive.
Industry data shows that a well-maintained roof can withstand winds approximately 20% faster than a neglected one. This highlights an important truth: roof wind resistance isn’t just about what materials you choose—it’s about how well you care for them over your home’s lifetime.
Materials & Roof Shapes That Stand Up to Storms
When Mother Nature throws her worst at your home, the materials covering your roof make all the difference. It’s like choosing the right armor for battle – some options simply offer better protection than others.
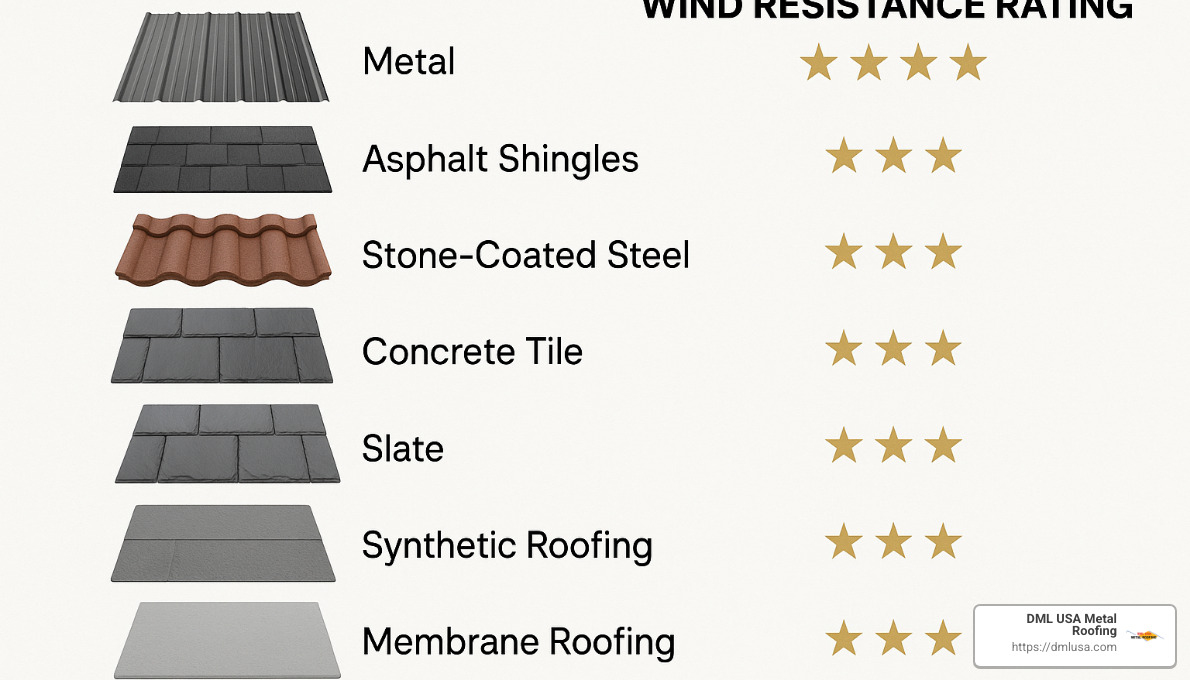
Metal roofing stands as the champion of wind resistance among common roofing materials. These systems typically withstand winds up to 140 mph, with specialized options handling an impressive 160+ mph. What makes metal so effective? It’s the smart design of interlocking panels creating a continuous surface that fights uplift, while its relatively light weight actually reduces stress on your home’s structure during wild weather.
Stone-coated steel gives you the best of both worlds – metal’s incredible strength with the classic look of traditional materials. These systems not only mimic the appearance of shingles, shake, or tile beautifully, but the stone coating actually disrupts airflow patterns, reducing those dangerous uplift forces that can tear roofs apart.
“I installed stone-coated metal on my Florida home after Hurricane Irma,” shares one homeowner. “During last year’s storms, my neighbors were picking up shingles from their yards while my roof didn’t budge an inch.”
Impact-resistant (Class 4) shingles significantly outperform their standard asphalt cousins. While regular shingles typically tap out at 60-80 mph winds, these tougher versions can handle gusts of 110-130 mph. They achieve this through stronger mat materials, additional sealant strips, and heavier granules that stay put when the wind howls.
Concrete tile roofing brings impressive wind resistance to the table, withstanding winds over 150 mph when properly installed. The substantial weight (typically 900-1200 pounds per square) helps anchor your roof against uplift forces. Just remember that this weight demands a robust roof structure underneath for proper support.
Natural slate offers excellent wind resistance thanks to its weight and incredible durability. The downside? Individual slate tiles can crack on impact, making them somewhat vulnerable to debris flying through the air during storms.
Synthetic roofing products cleverly mimic slate or shake while providing good wind resistance without excessive weight. Many feature interlocking designs or specialized wind-resistant features built right in.
Membrane roofing, commonly seen on flatter commercial roofs, depends heavily on proper adhesion and secure perimeters. Fully-adhered systems typically weather high winds better than mechanically-attached or ballasted alternatives.
Your roof’s shape plays a surprisingly important role in how it handles high winds:
Hip roofs (sloped on all four sides) dramatically outperform gable roofs during windstorms. Without large, vertical end walls to catch wind like sails, and with slopes that naturally deflect wind forces, hip roofs can reduce wind loads by 40% or more compared to gable designs.
Mono-slope roofs (single plane sloping in one direction) perform quite well when properly oriented relative to prevailing winds. The key is avoiding designs where wind can sneak underneath the high edge and create lift.
Dome or arch roofs showcase excellent aerodynamics, allowing wind to flow around rather than creating pressure points. While you won’t see these shapes in every neighborhood, they provide superior performance when the weather turns ugly.
| Roofing Material | Wind Rating (mph) | Relative Cost | Lifespan (years) |
|---|---|---|---|
| Standard Asphalt Shingles | 60-80 | $ | 15-20 |
| Impact-Resistant Shingles | 110-130 | $$ | 20-30 |
| Standing Seam Metal | 140-160 | $$$ | 40-70 |
| Stone-Coated Metal | 120-150 | $$$ | 40-70 |
| Concrete Tile | 150+ | $$$ | 50+ |
| Clay Tile | 130+ | $$$$ | 50+ |
| Natural Slate | 130+ | $$$$ | 75+ |
| Synthetic Slate/Shake | 110-140 | $$$ | 30-50 |
Why Metal Leads the Pack in Roof Wind Resistance
There’s a reason why metal roofing consistently outshines other materials when winds kick up. At DML USA Metal Roofing, we’ve carefully engineered our products to maximize these natural advantages.
Interlocking seams create a continuous surface that spreads wind loads across your entire roof rather than concentrating them at vulnerable spots. Standing seam systems, where panels connect with raised seams that lock together mechanically, offer the highest level of protection available today.
I’ve seen the difference after storms. While asphalt roofs often show scattered damage or missing shingles, properly installed metal roofs typically remain intact, with the interlocking design allowing them to respond to wind as a unified system rather than as individual pieces fighting the elements alone.
Concealed fasteners eliminate penetrations through the weathering surface. Unlike exposed-fastener systems where screws puncture through the panel (creating potential leak points), concealed fastener designs secure panels from underneath. This prevents water intrusion and stops fasteners from working loose during repeated wind events.
These thoughtful design elements translate to impressive real-world performance. Many metal roofing systems are tested and rated for wind speeds of 140-160 mph. Some specialized systems resist even stronger forces.
DECRA panels, for example, “are warranted for winds up to 120 mph and lab tested at twice that velocity.” This substantial safety margin gives homeowners confidence that their roof will perform as expected when severe weather strikes.
Beyond standing strong against wind, metal roofing offers additional benefits perfect for storm-prone regions:
- Class A fire ratings protect against wildfire embers that might accompany high winds
- Class 4 impact resistance stands up to hail and wind-blown debris
- Lightweight construction reduces structural loads while maintaining strength
- Long lifespan of 40-70 years minimizes replacement cycles
- Energy efficiency can cut cooling costs by up to 25%
- Tax credits may be available for energy-efficient metal roofing
Yes, metal roofing typically costs more upfront than asphalt shingles. But when you consider reduced maintenance, extended lifespan, and superior protection, the long-term value becomes clear. For many homeowners, simply sleeping soundly during storm season justifies the investment.
Learn more about why metal roofing might be right for your home
Comparing Asphalt, Tile, and Synthetic Options
While metal roofing leads in wind resistance, other materials have their own performance profiles worth understanding.
Asphalt shingles remain America’s most popular roofing material, largely due to affordability and familiar appearance. Standard three-tab shingles typically resist winds of 60-80 mph – adequate for many regions but insufficient for areas that see frequent hurricanes or severe storms.
Architectural or dimensional shingles step up the game with many rated for 110 mph. The best impact-resistant shingles can withstand winds up to 130 mph when properly installed. Their additional weight and multiple layers improve resistance, but they still can’t match what metal roofing delivers.
“My Florida home had architectural shingles before I upgraded to metal,” shares one homeowner. “After losing shingles in three separate storms despite proper installation, I made the switch. Haven’t lost a wink of sleep during hurricane season since.”
Concrete and clay tiles offer excellent wind resistance when properly installed, with concrete tile roofs tested to withstand hurricane-force winds of 150 mph. Their performance depends heavily on installation quality and your roof structure’s ability to support their significant weight.
The main weakness of tile roofs isn’t wind uplift – their weight anchors them well – but rather impact damage. Individual tiles can crack when struck by debris, creating entry points for wind and water. Once a few tiles break, the damage can quickly spread.
Synthetic options like polymer shake and slate alternatives provide a middle ground. These products typically offer better wind resistance than asphalt shingles while being lighter and more impact-resistant than natural materials.
Quality synthetic slate products can withstand winds of 110-140 mph. Many incorporate clever interlocking edges or improved fastening systems specifically designed for high-wind regions.
The weight-to-performance ratio deserves careful consideration. While heavier materials generally resist uplift better (as weight counteracts lift), they also place greater stress on your roof structure. In extreme events, a roof that’s too heavy can actually increase the risk of structural failure.
For homeowners in moderate wind zones who prefer traditional aesthetics, high-end asphalt or synthetic products may provide sufficient protection. However, those in hurricane-prone regions should strongly consider metal or properly installed tile systems for maximum security.
As one coastal contractor puts it: “When you’ve seen what 120 mph winds can do to standard roofing, the extra investment in wind-resistant materials starts looking like the bargain of a lifetime.”
Installation, Maintenance & Standards: Keeping Wind at Bay
When it comes to roof wind resistance, even the most premium materials can fail if they’re not properly installed or maintained. The way your roof is put together and cared for can be just as critical as the materials you choose.
Proper fastening is the foundation of wind-resistant installation. For asphalt shingles in high-wind regions, professionals often recommend the “six-nail method” instead of the standard four nails per shingle. This simple change can dramatically improve performance during storms.
“Nail or staple shingles at least 3/8″ apart, overlap each row by two inches, and use asphalt cement for added wind security,” explains one roofing expert I spoke with recently. “These small details make a huge difference when the wind really kicks up.”
Metal roofing has its own fastening requirements. In areas prone to high winds, clips might need to be placed every 12 inches rather than the standard 24. The type of clip matters too—some allow for thermal movement while others provide rigid connections, each offering different benefits depending on your climate.
Adhesives provide that extra layer of security that can make all the difference during a storm. For asphalt shingles, manually applying roofing cement can reinforce those factory adhesive strips, especially important when installing during colder months when thermal sealing might take weeks or even months to activate fully.
“During winter installations, we always hand-seal asphalt shingles with manufacturer-approved roofing cement,” shares a contractor with 20 years of experience. “It’s like giving your roof a head start on protection until the sun can do its job.”
Metal panel installations often benefit from butyl tape or sealant between overlaps. This simple addition helps keep wind-driven rain from finding its way into your home during those sideways-rain storms we all dread.
Thermal sealing is a fascinating process that many homeowners don’t realize is happening. Most asphalt shingles come with factory-applied adhesive strips that activate when warmed by the sun. This creates a bond with the shingle above it, essentially creating a unified surface. But this process requires patience—in northern climates or during winter installation, your roof might remain vulnerable until adequate sun exposure occurs.
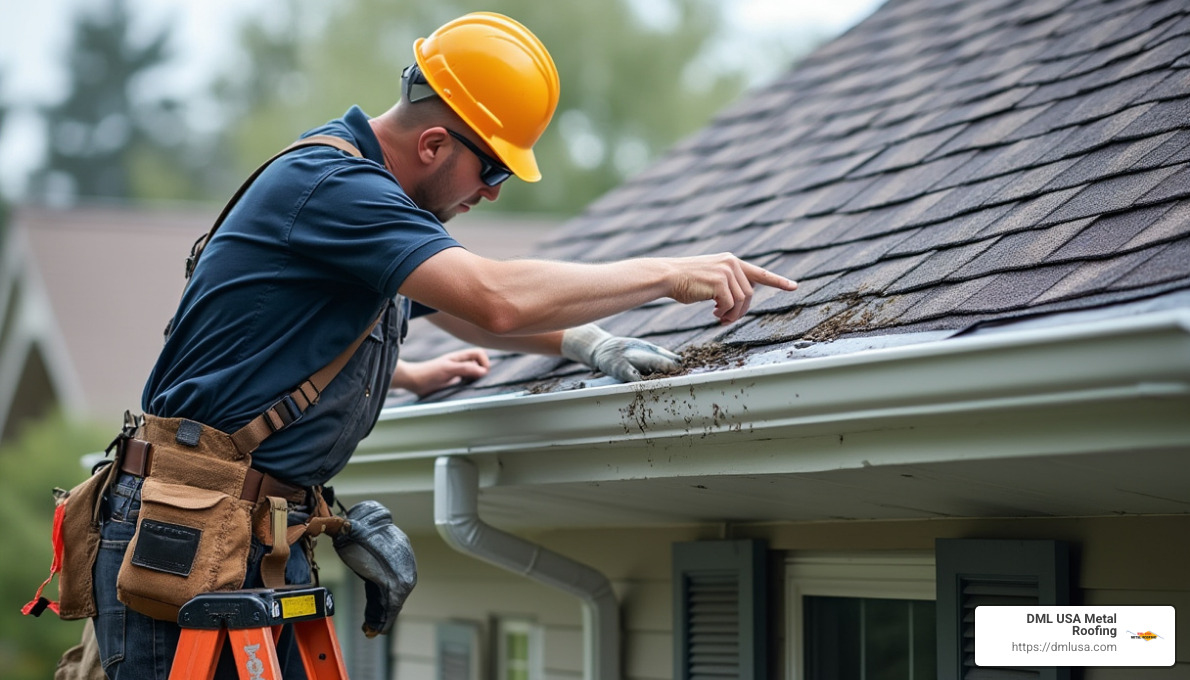
Maintaining your roof’s wind resistance requires regular attention. After any significant storm, take time for a routine inspection. Look for loose or missing materials, damaged flashing, exposed fasteners, and debris buildup in valleys or gutters. These small issues can quickly become major vulnerabilities if left unaddressed.
Don’t forget about your gutters! Gutter cleaning prevents water backup that can deteriorate roof edges over time. Plus, clogged gutters become surprisingly heavy during storms, increasing the risk they’ll pull away from your roof edge—exactly what you don’t want during high winds.
Those beautiful trees around your property? They need attention too. Tree trimming eliminates potential sources of wind-borne debris that could damage your roof during storms. Keep branches at least 10 feet from your roof surface—your roof will thank you during the next windstorm.
Industry standards continue to evolve as researchers learn more about how wind affects buildings. The ASTM D7158 standard has been updated multiple times to reflect new understanding of wind forces and material performance. These scientific advances help manufacturers develop increasingly wind-resistant products.
Scientific research on shingle standards shows how testing methodologies have improved over time, allowing for more accurate predictions of how roofing materials will perform in real-world conditions.
“Today’s building codes incorporate ASCE 7-16 criteria for determining wind loads as states update their requirements,” notes a building code specialist. “Each update typically includes more stringent requirements for roof systems in high-wind regions.”
Building Code & Warranty Checklist
Navigating building codes and warranty requirements can feel like trying to read a foreign language. Let me simplify this important information for you.
The IBC 2018 (International Building Code) serves as the model code that many local jurisdictions adopt. Chapter 16 and Section 1504 specifically address how your roof should be designed to resist wind. The code requires wind loads to be calculated according to ASCE 7, which considers factors specific to your location.
ASCE 7-16 provides the methodology for calculating these wind loads based on several factors: the basic wind speed for your location, the risk category of your building, the surrounding terrain, and your building’s height and roof geometry. Think of this as the science behind keeping your roof attached during storms.
If you live in a hurricane-prone area, you might encounter Miami-Dade HVHZ (High-Velocity Hurricane Zone) standards. These represent the gold standard for wind resistance in the United States. Products approved for these zones have passed exceptionally rigorous testing for wind uplift, wind-driven rain, and impact resistance. Even if you don’t live in Florida, choosing Miami-Dade approved products gives you extra peace of mind.
When reviewing product specifications, you might see FM 1-60+ ratings. These ratings from FM Approvals indicate tested wind uplift resistance in pounds per square foot. For example, an FM 1-90 rating means the system resisted 90 psf during testing. What’s reassuring is that these ratings include a 2:1 safety factor, so that FM 1-90 system was actually tested to 180 psf.
Now, let’s talk warranties—they’re not all created equal. Check these critical elements:
Wind speed coverage in manufacturer warranties typically ranges from 110-130 mph for premium asphalt shingles and up to 120-140 mph for metal roofing. But these impressive numbers often come with conditions: proper installation according to specifications, use of complete roofing systems (not just the main material), and timely warranty registration.
Will you be selling your home someday? Check the warranty transferability. Some wind warranties become prorated or completely void when you sell your home, while others can transfer once to a new owner.
Always read the fine print for wind-speed clauses. Some warranties exclude “acts of God” or extreme events. Understanding exactly what’s covered before a storm hits is much better than finding limitations afterward.
“The difference between a good warranty and a great one often comes down to the details,” explains one of our metal roofing specialists at DML USA. “We believe in transparency, so we make sure our customers understand exactly what protection they’re getting.”
Pro Tips for Installers & DIY Inspections
Whether you’re a professional roofer or a homeowner who likes to keep a close eye on things, these insider tips will help ensure maximum wind resistance.
For the pros out there, hand-sealing in cold weather is non-negotiable for asphalt shingles. Those factory adhesive strips need warm temperatures (typically above 70°F) to bond properly. During cold-weather installations, manually apply approved roofing cement under each shingle tab for immediate wind protection.
When installing metal roofing, pay attention to those countersunk screws. They should be driven straight and tightened until the washer is compressed—but not overtightened to the point of deformation. Finding that sweet spot ensures a watertight seal without damaging the panel.
Smart installers use staggered seams in multi-layer systems. By offsetting the seams in each layer of underlayment, insulation boards, or roofing panels, you create a more wind-resistant assembly without continuous failure lines where wind could gain entry.
Don’t forget about improved perimeter fastening. Edges and corners experience the highest wind pressures—often requiring 50-100% more fasteners than the main field of the roof. This is no place to cut corners (pun intended).
For homeowners conducting their own inspections, start in the attic. Attic inspections can reveal the earliest signs of problems before they become visible from outside. After high winds, grab a flashlight and check for light penetration through the roof deck, water stains, displaced insulation, or nail pops (fasteners backing out of the wood).
Create a visual record with photographic documentation. Take detailed photos of your roof annually and after any installation or repairs. These images become invaluable for identifying subtle changes that might indicate developing problems.
Not comfortable climbing on your roof? No problem. Binocular inspection from the ground can identify many issues without the risks of roof access. Look for missing, curled, or lifted materials; damaged flashing around chimneys and vents; sagging along ridgelines; and debris accumulation in valleys.
Timing matters for inspections. Mark your calendar to check your roof in spring after winter’s harsh conditions, after any significant storm, in fall before winter arrives, and any time after nearby construction or tree work.
For metal roofing specifically, verify that panel seams remain engaged, trim pieces are secure, panels don’t show signs of oil-canning (waviness), and sealants remain flexible and intact.
Above all, safety comes first. If you’re uncomfortable accessing your roof, hire a professional inspector. The cost of inspection is minimal compared to the potential damage from undetected problems—not to mention the peace of mind that comes from knowing your roof is ready for whatever weather comes your way.
Post-Storm Action Plan, Upgrades & FAQs
When fierce winds have finally calmed, knowing exactly what to do next can save you thousands in potential damage. I’ve seen how quickly a small roof issue can spiral into major headaches when left unchecked after a storm.
The moment it’s safe to go outside, start your immediate assessment by scanning for obvious problems. Look for missing shingles, scattered debris, or damaged metal panels visible from the ground. Don’t forget to check inside too—water stains on ceilings, damp insulation in your attic, or unusual light penetration through the roof deck are all warning signs that your roof’s wind resistance has been compromised.
“I always tell homeowners to check their attics first,” shares one roofing contractor. “That’s where you’ll spot problems before they make it to your living room ceiling.”
Many homeowners are now turning to drone inspection as a safer alternative to climbing ladders after a storm. This technology provides detailed aerial images without the risk of walking on a potentially unstable roof. At DML USA Metal Roofing, we’ve seen how these high-resolution images can catch subtle damage that might be missed during ground inspections.
If you find damage, temporary covers are your immediate priority. Quality tarps, properly secured without creating additional punctures, can prevent water infiltration until permanent repairs are possible. Water damage can multiply your repair costs exponentially, so this step is crucial even for seemingly minor issues.
Document everything carefully for your insurance claims. Take date-stamped photos from multiple angles, save every receipt for emergency repairs, and keep detailed notes of all conversations with contractors and insurance representatives. Most policies have specific timeframes for reporting storm damage—typically 30 days—so don’t delay in making that initial call.
For homeowners looking to strengthen their existing roof without a complete replacement, several reinforcement retrofits can dramatically improve wind performance:
Adding hurricane straps creates a secure connection between your roof rafters and wall plates, addressing one of the most common failure points during high winds. These small metal connectors can increase your roof’s wind resistance by up to 40%.
Reinforcing gable end walls with additional bracing prevents the “balloon” effect that can cause catastrophic failure during storms. This is particularly important for homes with large, steep gable ends that catch wind like a sail.
“One of our customers in coastal Illinois reinforced their 15-year-old metal roof with external seam clamps before last year’s derecho,” recalls our installation manager. “While their neighbors suffered significant damage, their roof remained intact despite 100+ mph gusts.”
These external seam clamps for metal roofing are remarkably effective. According to independent testing, “WindClamps can increase allowable loads by as much as 300%.” These small devices secure existing metal roof seams at strategic intervals, preventing the separation that often leads to catastrophic failure during high winds.
When it’s time to reroof, consider adding a secondary water barrier like self-adhering underlayment. This additional layer seals around fastener penetrations and provides waterproof protection even if your primary roofing materials sustain damage. It’s relatively inexpensive insurance against the most common form of post-storm damage—water infiltration.
Budget planning for wind-resistant upgrades should balance immediate costs against long-term benefits. While upgrading to premium wind-resistant features might increase your initial investment by 15-30%, these improvements typically deliver:
- Lower insurance premiums (often 10-25% reductions)
- Significantly reduced repair costs over the roof’s lifetime
- Improved home resale value, especially in storm-prone regions
- The priceless peace of mind during severe weather events
At DML USA Metal Roofing, we understand that budget constraints are real. That’s why we offer consultation services to help homeowners identify the most cost-effective improvements for their specific situation—whether that means a complete replacement or strategic upgrades to the most vulnerable areas.
Frequently Asked Questions about Roof Wind Resistance
Q: What wind speed can my roof handle?
A: Your roof’s wind resistance depends on three key factors: the roofing material, installation quality, and overall design. As a general guideline:
Standard three-tab asphalt shingles typically withstand winds of 60-80 mph before showing signs of damage. Architectural or dimensional shingles perform better at 80-110 mph, while specially designed impact-resistant shingles can handle 110-130 mph when properly installed.
Standard metal roofing systems generally resist winds of 110-140 mph, with premium systems capable of withstanding 140-160+ mph or even higher. Our DML USA metal roofing products consistently perform at the higher end of this range.
Properly installed concrete tile roofs can resist winds exceeding 150 mph, though they’re more vulnerable to impact damage from flying debris.
To determine your specific roof’s rating, check your installation documentation or contact the manufacturer with your product information. Your local building code also establishes minimum requirements based on your location’s wind zone.
Q: Can I reinforce an existing roof?
A: Absolutely! I’ve seen remarkable improvements in wind performance through targeted reinforcements:
For asphalt shingle roofs, apply roofing cement under loose shingle tabs, particularly along edges and corners where wind uplift is strongest. Replace any damaged or missing shingles immediately, as these create entry points for wind to get underneath and peel back additional material.
For added structural strength, consider having closed-cell spray foam applied to the underside of your roof sheathing from within the attic. This creates a powerful bond between sheathing and rafters that dramatically increases wind resistance.
Metal roof owners can add external seam clamps at manufacturer-specified intervals, reinforce edge terminations and trim, and replace any worn or damaged fasteners. Even a single missing fastener can create a weak point for wind exploitation.
The most effective time to improve wind resistance is during reroofing, when you can incorporate comprehensive improvements like better underlayment, proper edge metal, and upgraded fastening systems throughout the roof.
Q: How do I choose a wind-resistant material on a budget?
A: When budget constraints limit your options, focus on smart compromises that maximize wind protection for your investment:
Proper installation trumps material quality every time. Even basic materials installed correctly will outperform premium materials installed poorly. Choose an experienced contractor with specific training in wind-resistant installation techniques.
Focus on vulnerable areas first. Use improved starter strips at eaves and rakes, select better underlayment (especially self-adhering products at edges and valleys), and invest in proper flashing and edge metal. These targeted upgrades deliver the biggest performance improvements per dollar spent.
Consider architectural shingles instead of three-tab varieties. They typically offer significantly better wind resistance for a modest cost increase of 15-25%.
Don’t forget to explore insurance discounts for wind-resistant features, which can offset higher material costs over time. Many insurers offer premium reductions of 5-15% for documented wind-resistant improvements.
“A well-maintained roof can withstand winds 20% faster than a neglected one,” according to industry data. Regular maintenance and prompt repairs remain the most cost-effective way to improve wind resistance on a tight budget.
Q: How often should I inspect my roof for wind damage?
A: At minimum, I recommend inspecting your roof twice yearly—in spring after winter weather stress and in fall before storm season returns. Additionally, check after any storm with winds exceeding 50 mph, following hail events, and after nearby construction or tree work that might have caused indirect damage.
Professional inspections provide an extra layer of security. Schedule these every 3-5 years for asphalt roofs and every 5-7 years for metal roofs, even without visible issues. Professionals can spot subtle warning signs that most homeowners miss until they become major problems.
Q: Do different roof shapes really make a difference in wind resistance?
A: The impact of roof shape on wind performance is dramatic and well-documented. Hip roofs (sloped on all four sides) can reduce wind uplift forces by up to 40% compared to gable roofs with the same pitch and materials. This significant advantage explains why hip roofs dominate in hurricane-prone coastal regions.
Multiple-slope designs that avoid large, flat surfaces perform best in high winds by allowing air to flow more smoothly over the structure. Simple aerodynamic principles explain why—when wind hits a steep slope, it tends to follow the surface rather than creating the strong uplift that damages flatter designs.
If you’re building new or considering a major renovation, the roof shape should be one of your first considerations for wind resistance, even before selecting materials. The right design choice can improve performance more than any material upgrade.
Conclusion
As we wrap up our journey through roof wind resistance, I hope you’ve gained valuable insights into protecting your home from nature’s fury. We’ve covered a lot of ground, from materials and design to installation and maintenance—all working together to keep your roof firmly in place when those storm winds howl.
The evidence speaks volumes: metal roofing stands head and shoulders above other materials when it comes to wind performance. With premium systems capable of withstanding winds of 140-160 mph or more, it’s no wonder more homeowners in wind-prone areas are making the switch. This exceptional strength, paired with metal’s impressive durability and energy efficiency, creates a compelling case for metal as your next roofing material.
Here at DML USA Metal Roofing, we take pride in crafting high-quality, affordable metal roofing that doesn’t just meet industry standards—it exceeds them. We believe your roof should give you confidence when storm clouds gather, not anxiety.
But the benefits of our metal roofing systems extend far beyond just keeping the wind at bay. Homeowners also enjoy energy tax credits that help offset initial costs, up to 25% reduction in cooling expenses thanks to reflective technology, and Class A fire ratings for comprehensive protection. Add in Class 4 impact resistance against hail and debris, plus minimal maintenance requirements throughout a 40+ year lifespan, and you can see why metal makes sense for the long haul.
Whether you’re building your dream home from scratch, replacing an aging roof that’s seen better days, or looking to upgrade your current roof’s wind resistance, our team is ready to help. Our experts across Illinois, including our Northlake and Chicago locations, can guide you through selecting the perfect system and connect you with qualified installers who understand that proper installation is just as important as quality materials.
Your roof represents your home’s first and most important line of defense against Mother Nature’s mood swings. Choosing a wind-resistant roofing system isn’t just about preventing property damage—it’s about protecting what matters most: your family, your treasured possessions, and your peace of mind.
Learn more about our products and how they can protect your home
The next time strong winds rattle your windows, you’ll rest easier knowing your DML USA metal roof was engineered specifically to handle those forces, standing strong and secure through whatever weather comes your way. After all, that’s what real roof wind resistance is all about—not just surviving the storm, but giving you confidence through every season.